The Way That I Cast : Lost Wax Process- Part 6

Last time I discussed the most basic casting set-up that I could think of, that was likely to create successful results. I also mentioned the biggest problem with this system – your model is destroyed in the process.

The biggest question about casting that you really need to ask yourself is “Is this something that I want to do just once, or twice, or is this something that I want to be able to continue to do for the foreseeable future?” And along with this question is another important issue – “Do I feel that I have to do all the parts of the casting process myself? Or can I “farm out” some, or most, of the process to a professional?”

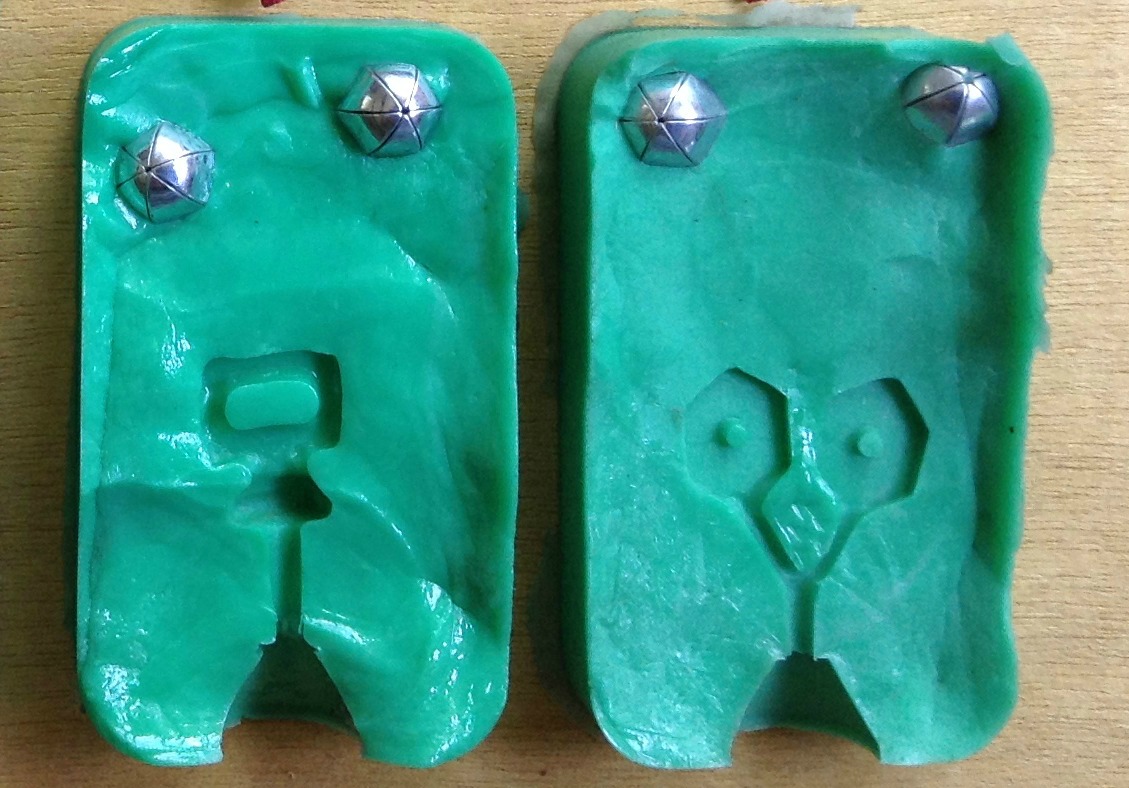
So what sort of options do we have? Well, the first thing that comes to mind is to solve the problem of destroying your model yourself. You can make a mold of the model so that you have the option of making copies of the model if you want to make more items, or if the casting process fails. There are a lot of very user-friendly Room Temperature Vulcanizing compounds out there that do not require any special equipment. I have more complex equipment, but I still often use RTV compounds to make molds. Here are a couple of my molds.

RTV molds

What if you really enjoy the idea of making the model, but you really are just not up to doing the casting yourself? Well there are reputable companies in the US that will take your model and cast it for you. They will generally want to make a mold of the model as insurance against a failed casting. You can arrange to receive the mold yourself, along with the cast piece, or have them archive the mold. Be sure to understand all of the costs, who owns the mold, and whether they archive it, or you get it back.

I do not recommend sending a model “offshore” to places like Pakistan or China. Factories in these areas usually specialize in large quantity production. They often own the molds, and you may not get your master back. Your legal recourse if you are not pleased with the results, is limited, and you will have to pay import fees. I do know people who have their business production done off-shore. The Pakistani company is casting bronze pieces and their minimum order is 1000 of the same pieces. I was not impressed with their quality. The Balinese company is casting silver. They will cast much smaller numbers of items, but still not ones and twos, and their quality is very good.

But back to getting work done in the US. As long as you understand the fees and rules you should be fine. Taking this to the extreme, there are shops that will do custom casting, from design to finish. The most technologically savvy shops will have computer design capabilities that will use 3D printers to create the original model. I have seen them in action, and it is amazing. Small shops may also be willing to do wax models and cast very limited quantities.

I hope that this blog gives you some ideas about your casting options.

The Way That I Cast: Lost Wax Process Part 5

Last time we ran through the basics of the end of my lost wax casting process. But I often get questions about how I got started casting, and how other people could get started, too.

Well, like many people who hang around with reenactment groups, I had seen pewter casting, and took a basic class on carving soapstone molds and pewter casting. It was fun and I wanted to learn more about casting.

Only an hour drive from my house there was a community college with a jewelry department. They taught all day classes on Friday – 8 AM to 5PM. One of my girlfriends suggested that we take a Friday class together. So I went back to college. The classes were different every semester, and included casting, enamelwork, and metal forming. We had about three hours of lecture time and then the rest of the day was hands-on. Best of all we had access to all of the equipment that the jewelry lab had: kilns, centrifugal casting machines, torches, hydraulic presses, you name it. They didn’t care what sort of items we made, just that we were learning to do the semester’s processes.

I loved it. I took classes for a couple of years, and started collecting equipment to be able to do my own casting. I started casting using casting sand, instead of lost wax. It required a LOT less equipment.

Equipment is the big barrier for most beginning jewelers. My current set-up, if I had to buy it new, would be worth about $10,000, and that isn’t even counting the small tools and a lot of the expendable supplies. More basic set-ups are certainly possible. As I mentioned, I started my home casting projects using casting sand. This eliminated the need for almost all of the wax equipment, the mold making equipment, the flasks, the de-waxing and burnout ovens, the vacuum machine and the vacuum caster. The minute that you decide that you want to do lost wax casting there are a lot of expenses that can’t be avoided.

Equipment can be purchased used. I have actually purchased a lot of my equipment used through Rio Grande Jewelry supply. My basic bench and some of my hand tools were bought used from a jewelry company that was shutting down.

The most basic kit that I can think of, that would allow successful lost wax casting would require: a wax model, a flask large enough for the model, a base for the flask, investment to create the mold in the flask, a vacuum machine for removing the bubbles from the investment in the flask, a kiln to melt out the wax and harden the investment into a useable mold, a torch to melt the metal for the casting, a crucible to melt the metal in, and a centrifugal casting machine. Here is a picture of my centrifugal caster.

centrifugal caster

It literally, at the flip of a switch, flings the molten metal into the flask using centrifugal force. The biggest problem with the process that I just mentioned? You destroy your model. If the casting fails you have to create a new model.

Next time: More About Lost Wax Casting Options

The Way That I Cast: Lost Wax Process Part 4

Last time we created the actual molds that are used for casting, and we poured the molten metal into them. But what happens now? Well, they need to be quenched.

Quenched? Yes. The metal needs to be cooled down the rest of the way so that it can be handled, and it needs to be removed from the plaster in the flask. Quenching accomplishes both of these things at the same time. Here is a picture of my high tech quenching arrangement. I have a bucket of water sitting up on a metal stool. The still hot flask (in the tongs) is lowered into the bucket of water. Sizzle, spit, steam and it all happens. The forceps in my other hand are used to remove the still warm metal from the flask. I set it aside into another smaller container of water while I clean the flask.

quench and reveal

There is always some plaster left in the flask, so I scrape it out with a putty knife and throw it into the other bucket that you can see next to me on the floor. The flask is then scrubbed with a wire brush, rinsed and put on the floor to dry.

flasks drying

And here they are drying! Meanwhile the newly cast piece is sitting in a small container (an old cooking pot) full of water. It is now cool to the touch, and this is what a typical one looks like.

newly cast buttons

Once I am done casting it is time to begin making these messy looking blobs into something worthy of being put in my shop. This picture shows the basic process. First the pieces, in this case buttons, are cut off of their sprues. This process often requires that the metal has to be cut apart in stages so that none of the buttons are damaged. Then the sprues are set aside to be cleaned and the buttons are given an initial tumble to remove any remaining investment and reveal any surface imperfections. Any flawed buttons go into the sprue pile to be recycled later. The remaining buttons are sanded, polished, inspected, and touched up until they look like this.

smaller button picture

The sprues are then cleaned and polished to remove all traces of investment and metal oxides. They are then dried and put away for later use.

I thought it was important to include a lovely picture of me in all of my pouring safety gear. Quite the fashion statement!

full kit

So for those wishing to replicate this major fashion statement…Starting at the top we have a full face shield to prevent burns from splashing molten metal and boiling water. Under that shield we have a high quality particle dust mask. The process of quenching the flasks can put quite a bit of fine particulate silicon into the air, which is very bad for your lungs. The blue jacket with leather sleeves is a welding jacket – doesn’t catch on fire easily and protects from an assortment of hot things. Leather welding apron and gloves complete the ensemble. What you can’t see is loose fit cotton jeans and high top leather boots.

Next time: How I Got Started Casting