My display boards are a work in progress. Most of my boards are actually made as a sandwich – a piece of foam insulation with a layer of 1/4″ plywood on each side. I like the three dimensional look that this gives, along with relatively light weight and excellent warp resistance. The pieces of the “sandwich” are glued together with an industrial cement.
I have also used several boards over the years that are made from plain plywood, with varying degrees of “success”. I usually use 3/4 inch plywood, for strength and stability without too much weight – one of my current display boards is made of plywood. (Thin plywood warps with changes in moisture and eventually can warp quite badly.)
All of the display boards that I am currently using are covered with Velcro cloth. This fabric comes in many different colors and allows me to use “male” Velcro dots and strips to hold display hangers in place. These hangers can be put anywhere that I want to put them, allowing me to change the design of the display whenever I want to.
Before I discovered Velcro cloth I used to covered all of my boards with a neutral gray linen weave fabric. I liked the way the fabric showed off my jewelry – it was almost like having a model wear the piece. The linen looks nice but it isn’t as flexible, or durable, as Velcro cloth.
In addition to Velcro cloth I sometimes add short nails, called linoleum tacks, to the plywood boards to support items that are always placed in the same locations, and are fairly heavy. Before I switched to Velcro cloth all of my boards were made out of plywood and had permanent hangers made from linoleum tacks. For larger items some people also use cup hooks.
In order to work properly, Velcro cloth needs to be glued to the surface of the board. This is really not as difficult as it sounds, just use a spray adhesive like 3M 77. Be sure to follow the instructions on the can. Don’t forget to clean the spray nozzle by inverting the can and spraying to remove the adhesive in the nozzle. The Velcro cloth needs to be stretched gently to help it retain its shape. I use staples to fasten the cloth as it wraps around the display board.
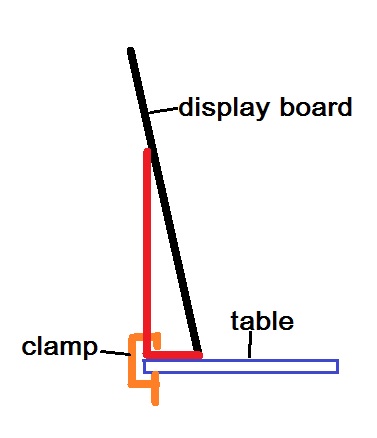
OK, so now we have some sort of board, covered with fabric, to use as a display board. How do we keep the board vertical, and anchored to the table? The red boards that are shown in the graphic show the basic principle of my system. The boards are clamped to the table, preventing them from falling over in a wind, or being knocked over by a clumsy customer.
 Here is a picture of an actual wooden support. You can see how the hinges are used to connect the boards and allow them to create a support.

The hasps used on the boards consists of a metal fastening that uses a hinged strap with a slot that fits over a staple and is secured by a pin. The picture shows the hinged strap. You can buy them at any hardware shop.
The next picture shows the top of the board, where the hasp on the support board is located. I use an inexpensive keychain karabiner to lock the hasp together through both the hinged strap and the staple. Using the karabiner allows the board to be set up and broken down very quickly.

And a side view of the same support. All of these pictures are from one of my short boards, and were taken in the back of my box truck. The only difference between the tall and short boards is the size of the boards and support structure. A karabiner is put through the staple (loop in the picture) to secure the hasp. This creates a triangular structure that is sturdy and does not deform easily.
You can see how I use staples to permanently fasten the Velcro cloth to the board. I use a power staple gun (it’s pneumatic and is very helpful). The staples have to go through several thicknesses of cloth on the display board corners, and must pass through the ¼” plywood facing. You can do this with a manual stapler, but it will be some real work to complete. I usually put a staple about every 4” all the way around the back of the display board. The Velcro corners are folded like a hospital corner for sheets. As you see, there is a little tension on the Velcro cloth – this is important to keep the cloth from sagging when you put heavier items on hangers. It’s very helpful to have an assistant to help stretch the fabric and fold the cloth, holding it while you staple it.

I hope that seeing how I build my display boards will give you some ideas about how to build your own!