Blog Year in Review for 2016

2016 marked the posting of another 50 blogs on my site! That’s right, I missed exactly two weeks during the entire year, not bad, if I do say so myself! That brings the total number of blogs that are available on my site to 219. The topics vary from camping, to metal working, Medieval Cooking, and researching, and just about everything in between.

This year was the year of long blog series, with five of my series having five or more blog entries. A lot of times they didn’t start out that way, but there really was just too much to say! You can easily search my complete collection by either topic or by the year and month. Just go to www.eirny.com and scroll down the page. The right hand column will have a list of the five most recent blogs, followed by a search box for viewing the blogs by month, a newsletter sign up (yes, I also do a weekly newsletter with relevant pre-1600 archaeological finds and news), two collections of links, and then a long list of the categories that the blogs are listed in. Just click on a category the list of blogs.

Choosing a favorite blog series is sort of like trying to decide which of my pets I like best, not an easy thing. But if I had to chose my favorite TWO long series, I would choose “Purses”, and “Vardos and Their Cousins”. Both of these series were a LOT of fun to write, and the Facebook commentary was fun and interesting to participate in for both of them.

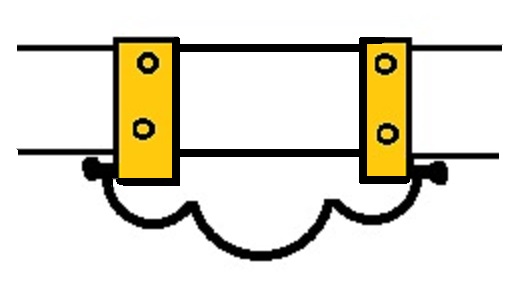
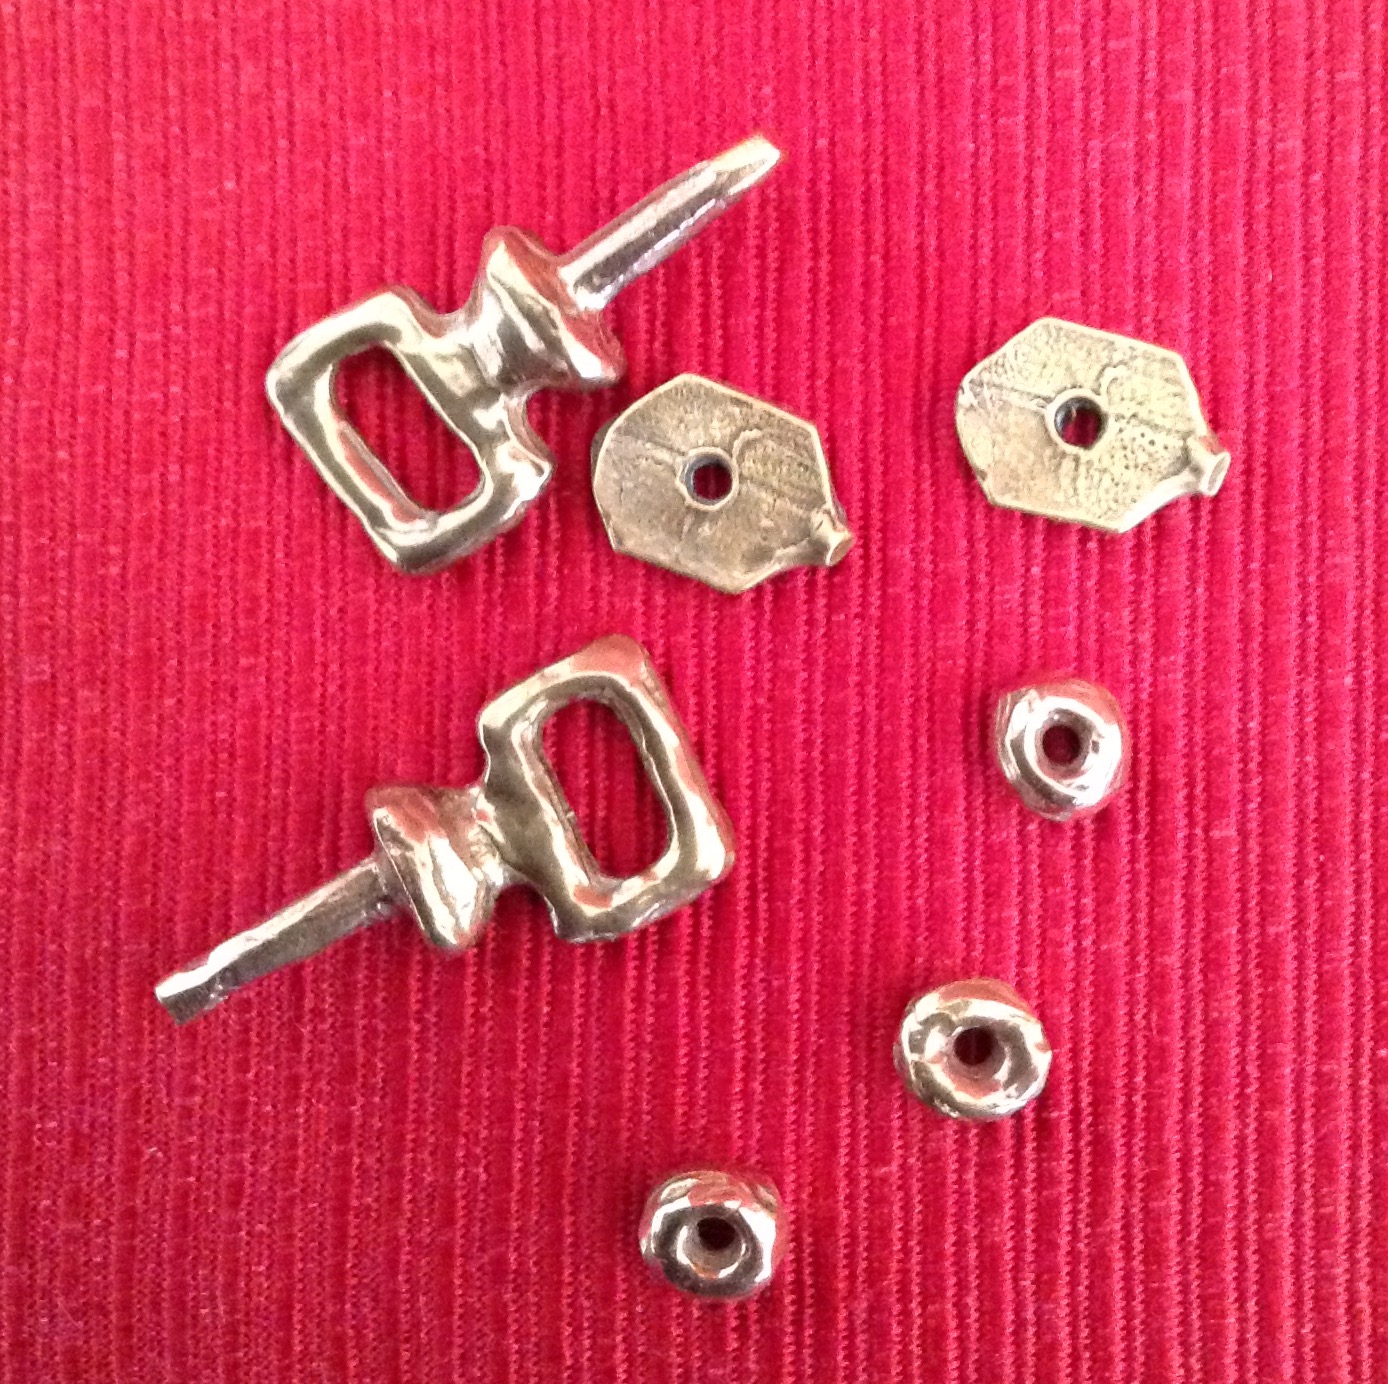
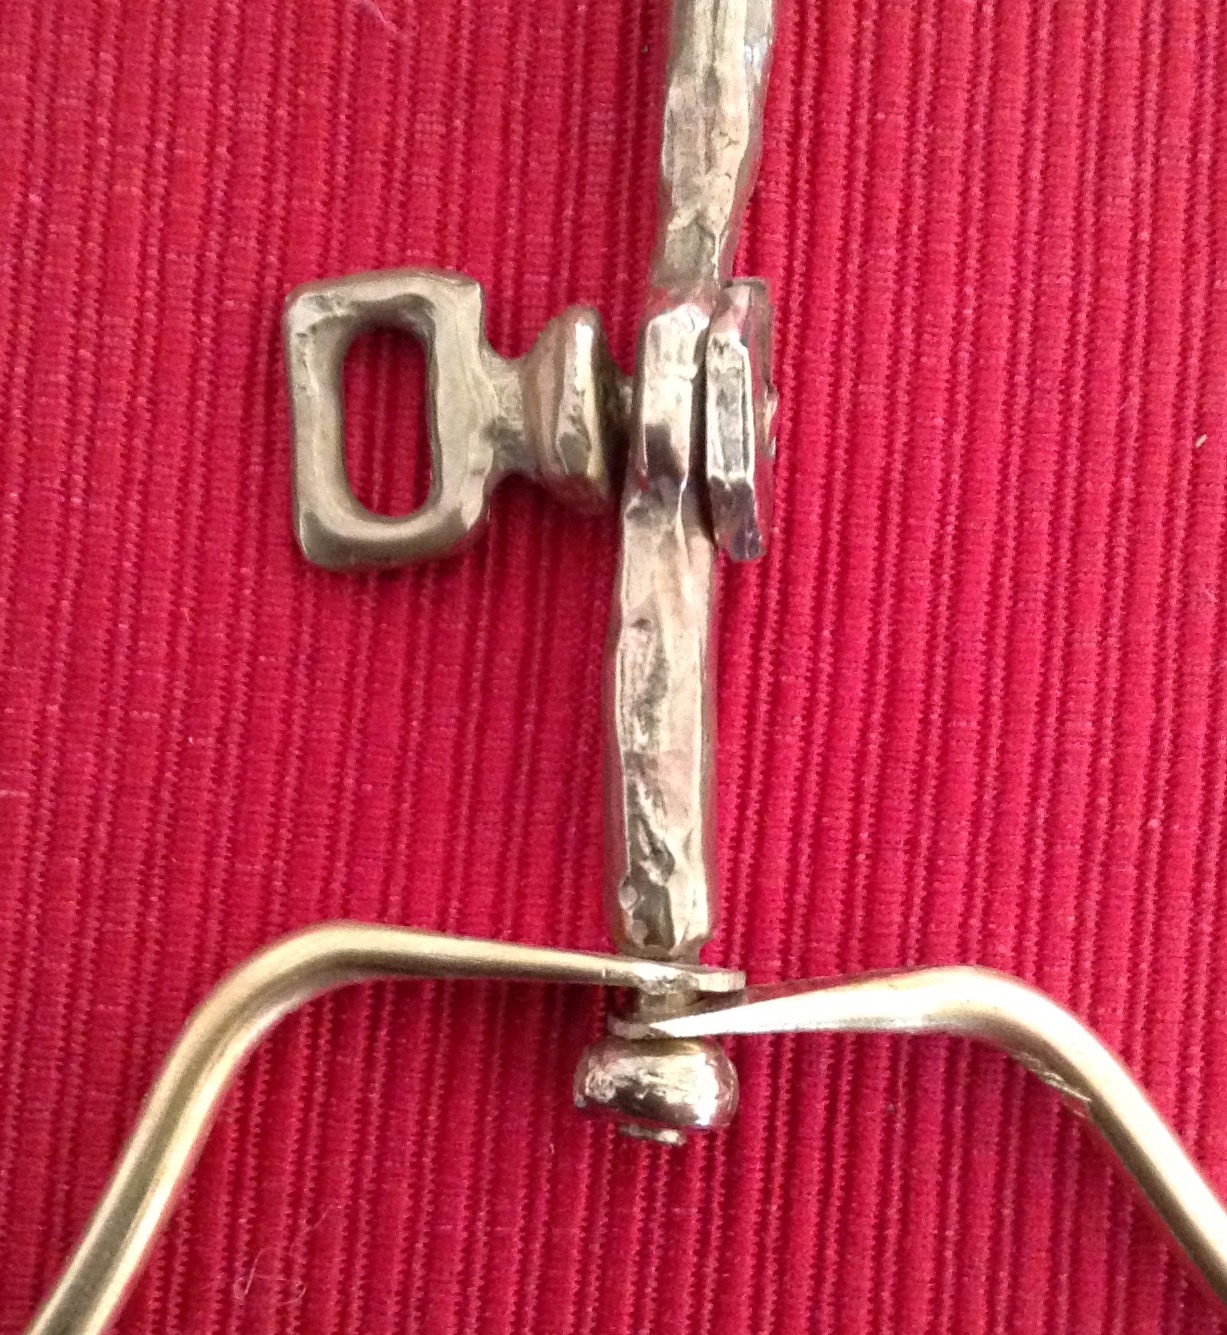
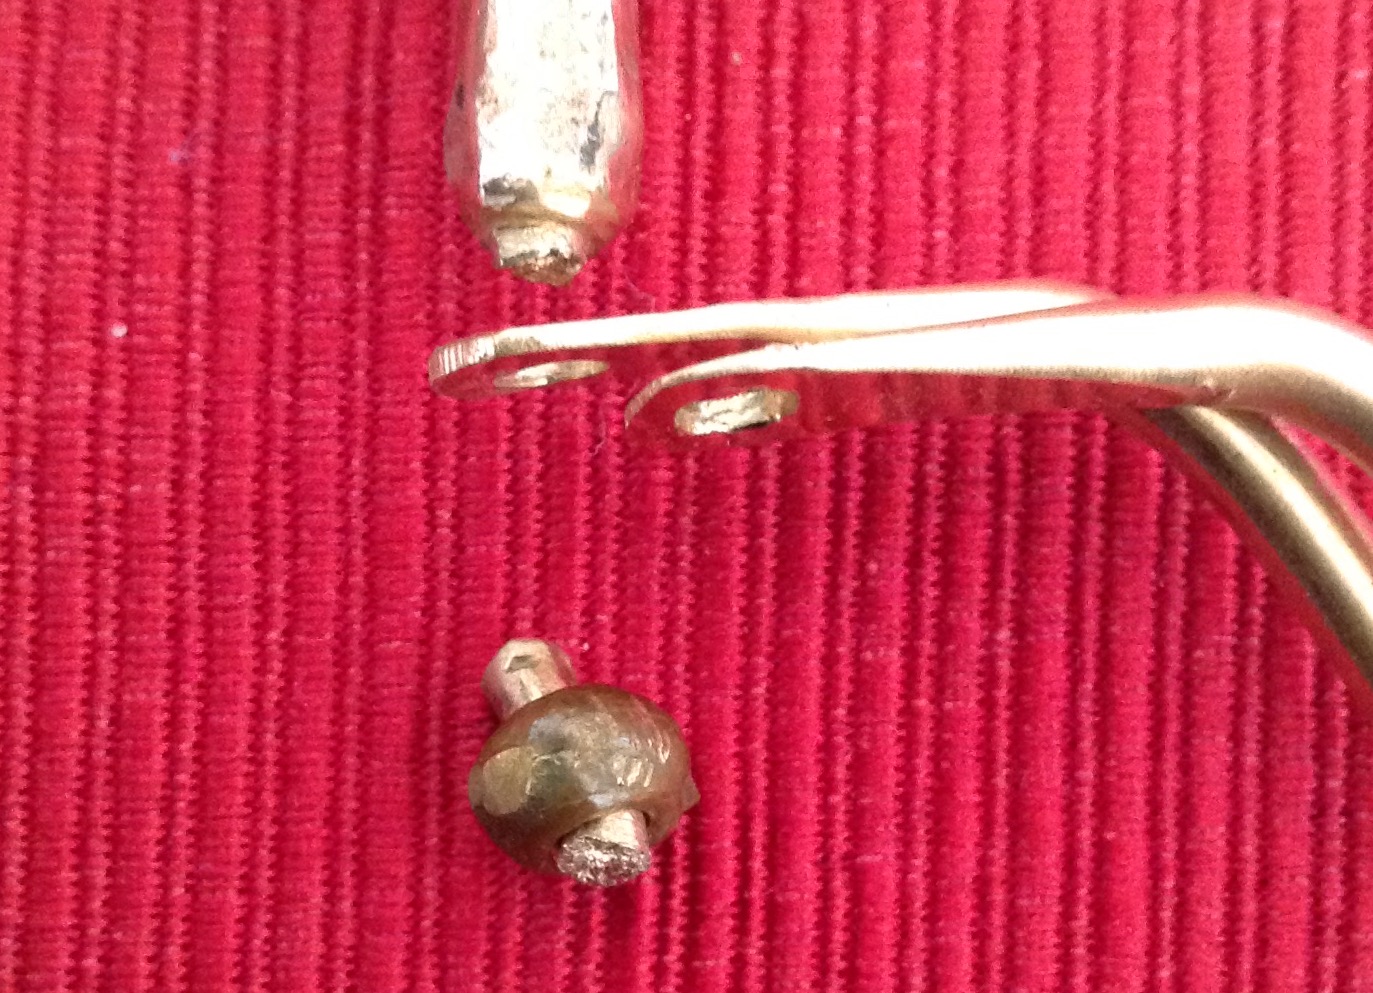
Purses was the longest of my blog series this year, with a total of 12 blogs. It chronicled my experimentation with making a purse frame, from research and understanding how they worked and were worn, through actually making a frame myself. It was a very interesting journey, and I plan to do more work on purses frames again this year.

Purses Part 1    

Purses Part 2: My First Attempt At A Purse With A Frame

Purses Part 3: Understanding The Basics of a Purse Frame

Purses Part 4: What The Clues Tell Us and More About Purse Forms

Purses Part 5: What Other Forms of Purse Frames Do We Find?

Purses Part 6: The Tip Of The Iceberg

Purses Part 7: Back Down To Earth

Purses Part 8: Where Do We Go From Here

Purses Part 9: Time For Metal

Purses Part 10: Time For Purse Frame Rings

Purses Part 11: Finishing Up The Frame

Purses Part 12: How Were Purses Used Historically

Vardos and Their Cousins had a total of five blogs in the series. It really brought home the variety of Vardos and other trailer based constructs that there are in use in the SCA.

Part 1

Part 2

Part 3

Part 4

Part 5

And not to be outdone, this lonely little blog: All Rulers Are Not Created Equal, was probably the most relevant to all folks who do ANY sort of craft that ever uses a ruler.

year-in-review-collage

Purses Part 12: How Were Purses Used Historically?

Now that we have the concept of how a Medieval metal frame purse is made, we should probably look at how they were used. I am not talking about what people put into their purses.  We can safely assume, since there are paintings of people taking coins from their purses, that they were sometimes used to hold money. I mean that we should try to understand how they wore their purses. What sort of options did they have?

Modernly, in most of the reenactment groups that I have seen, a purse is often hung directly from a belt. I have done this many times myself, and one of the problems is that if the purse is heavy it will tend to crease, roll, or fold the belt in an uncomfortable fashion. The physical abrasion of the purse cord can also damage the belt. We see lots of people in illuminations with all sorts of purses just hanging on strings or straps from their belts. But there is another solution, which also prevents the damage to your belt, and gives you yet another opportunity for bling. I am talking about purse hangers.

It is difficult to know how common purse hangers were in period, but a quick search in the Portable Antiquities Scheme Database reveals quite a few. I cast a couple of the most common forms of these hangers a couple of years ago. The first one that I cast was this one.

FullSizeRender(4)

We see several versions of this form of purse hanger, some with, and some without the bar. These purse hangers were usually permanently attached to the belt with rivets. This graphic shows how this cast piece is used. The string of the pouch can simply be looped over the suspended metal frame.

purse hanger

Here is a link to an actual example of this type of purse hanger in the Portable Antiquities Scheme.

Another common form of this hanger does not have the bar and uses two separate supports that are riveted to the belt, like this.

purse hanger two supports

The other form of purse hanger that I cast was this one.

FullSizeRender(5)

Here is an example of a similar purse hanger from the Portable Antiquities Scheme,

This type of hanger was attached to the belt with a piece of the metal and rivets just as in the previous examples.

There are many other forms of purse hangers, from simple hooks like this one to hangers with much more complex shapes than the ones that I cast.

I think that purse hangers could be a fun addition to a fancy outfit, and casting a couple of other shaped purse hangers is definitely on my “to-do” list. I hope that this sampling of purse hangers inspires you to try adding one, or more, to your collection of accessories.

Purses Part 11: Finishing Up the Frame

Last time I created eight gauge bronze wire wire purse frame rings and fitted them to the purse frame, but now we have to hold it all together.

When I was doing my original research I noticed a number of purse frames that appeared to have some sort of washer on the end of the purse frame bars. I decided that I liked the look of the washer and that the washer would also make for a more secure anchor for the rings on the purse bar. So when I was creating the original waxes from the replica, I also created some round washers that I thought would look good on the purse bar. I admit I guessed at the size, based on the size of the purse, but when the time came to actually use them, they were the right size. Here is a quick picture of some of my original cast pieces, including the washers.

FullSizeRender(1)

So I fitted the washers on to the purse bar, trimming the length of the purse bar end and smoothing it, and then riveted it together. And here is the result.

FullSizeRender(2)

The look of the washer was the perfect finishing touch for the frame.

What I learned from the Riveting process. No matter how careful you are measuring and hammering, it doesn’t always work the way you want it to. I broke one pivot trying to rivet it, and I also broke a hexagonal washer by accidentally cracking it – the casting actually had a tiny crack in it that I did not notice. Having a hole in the washer that is too tight can also cause the washer to crack when it is riveted. The pivot will expand a little bit, and too much expansion can crack the washer. And then there is the purse bar itself. Yes, I broke one of those, too.

FullSizeRender(3)

So where do I go from here? I will be working to fine tune the purse bar pieces. For a first try they are fairly close, but I will be modifying the pieces to make them a tiny bit sturdier, and I also want to improve the fit a little. Once I am pleased with the final look of the purse frame, I will be recasting it, and then I will be experimenting with casting purse frame rings. I really want to have the strength and stability of the “L” shaped purse ring and the ability to easily sew the purse bag onto the frame. And then what? I have a much larger broken purse frame bar that I think would make a really awesome larger purse…

Next time: How were purses used in period?