Part 3 – Making a Cool Storage Container – Interior Finishing Touches!

We have talked about choosing your box, designing your storage inserts to keep your item safe, and some of the basic principles of assembling your storage box. Now it is time to give the interior of your container a finished look.

I thought a LOT about this and decided that the best approach would be pictures, so I did a simple box and took a bunch of pictures!

steps 1 thru3

So here we have the process of a basic box. The entire box, the cut down box, and cutting the foam insert for the box – very messy process.

steps 4 thru 6

Here we have the final foam insert, stacked and glued together, the foam insert in the box, and the first fit of the fabric in the foam form. Once you are certain that the fabric is large enough, remove the storage item and the fabric from the foam. Apply the hot glue to the foam, put the fabric back in place, and quickly press the storage item back into the cavity. This will create a nicely lined cavity in the foam. Allow the hot glue to cool for a couple of minutes.

steps 7 thru 9

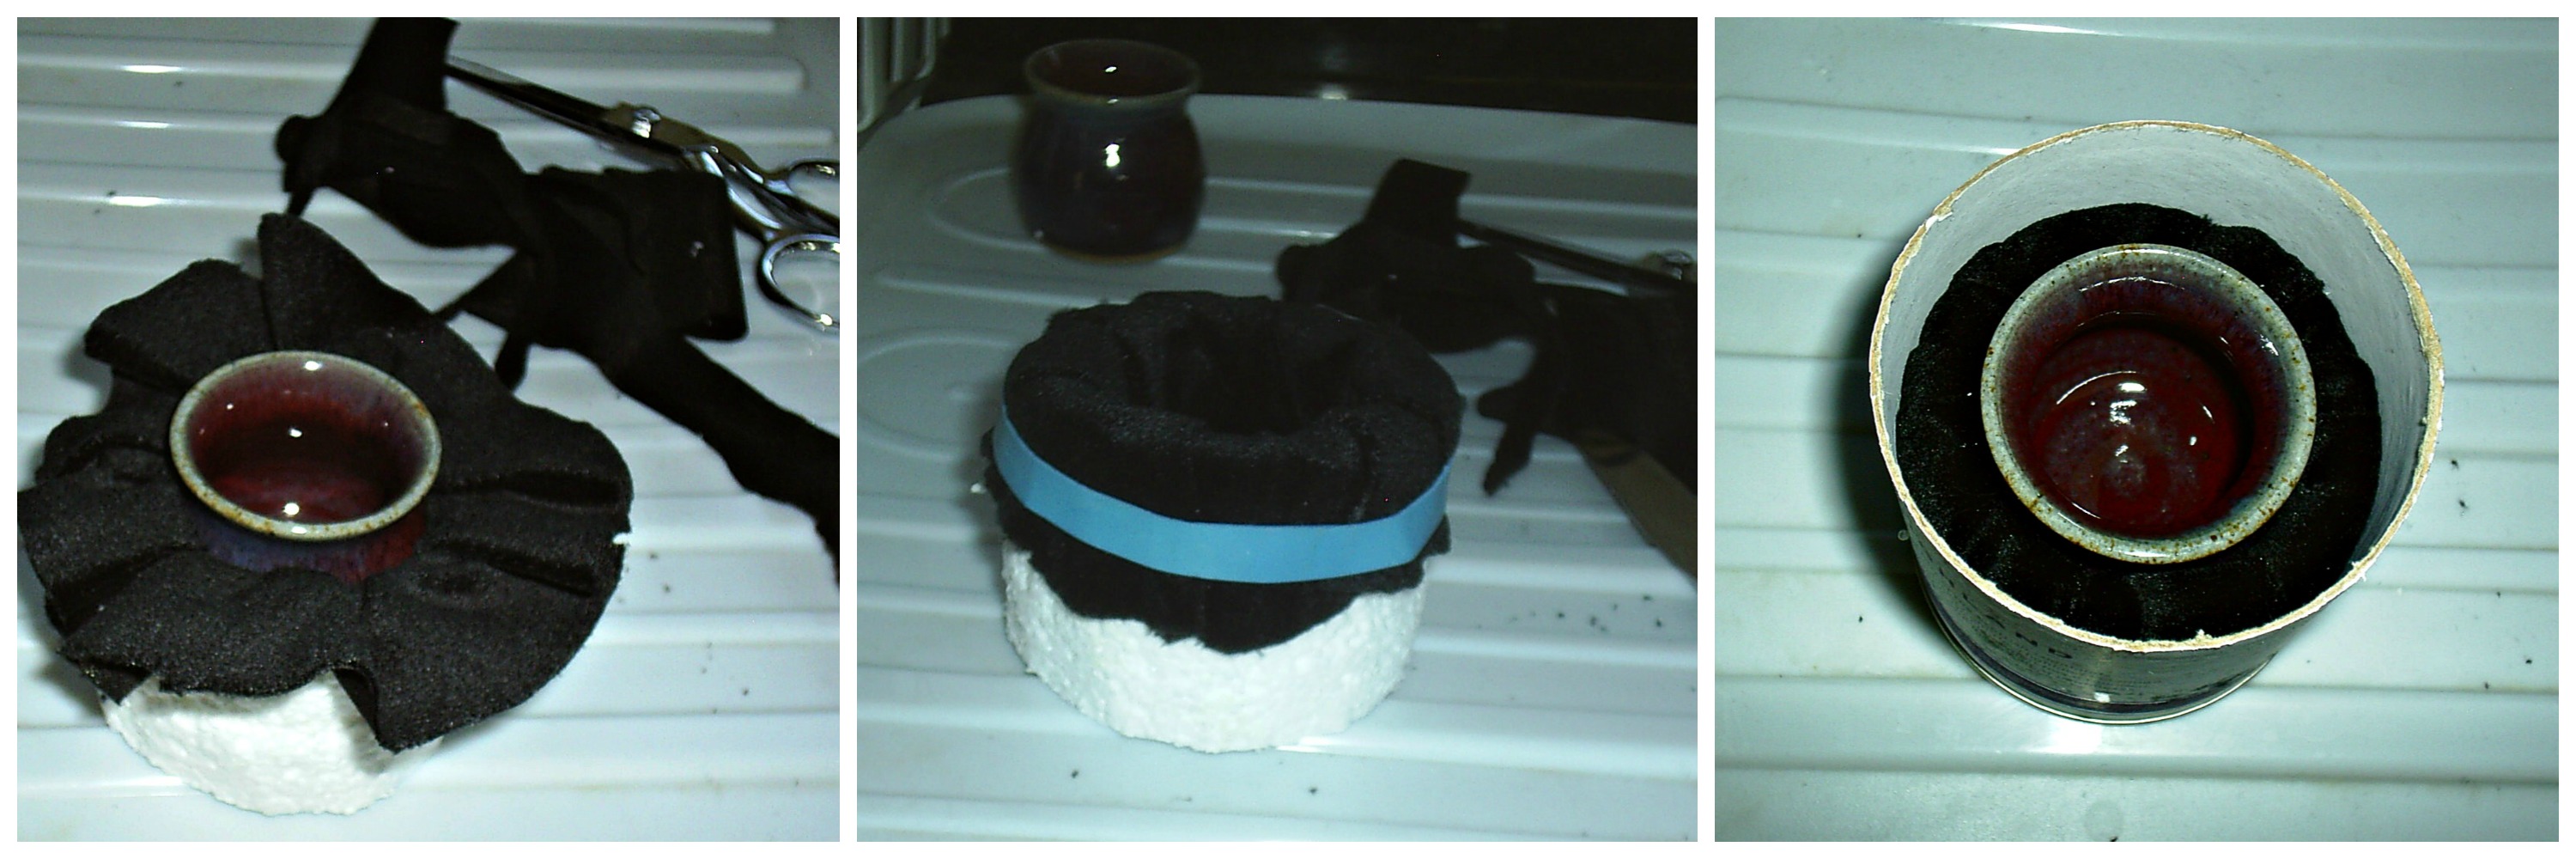
Trim the fabric into a rough circle (remember the box in this case is a circle so you want to be able to distribute the fabric evenly around the edge of the box). Lift up the edge of the fabric and apply more hot glue to hold the fabric down along the sides of the foam. Be extra careful during this process. The hot glue tends to leak out, and it can burn you and make a mess. I like to hold the fabric in place temporarily with a rubber band (that is what the blue stripe is). Allow the glue to cool and then, with the rubber band in place, slide the foam insert down into the box. As you slide it down, work the rubber band up and allow it to come off. Use a butter knife or a super thin metal spatula (narrow cake icing spatulas are perfect!) to push the fabric down between the foam and the wall of the box. This allows you to adjust the tension of the fabric and have a very neat and clean looking finish.

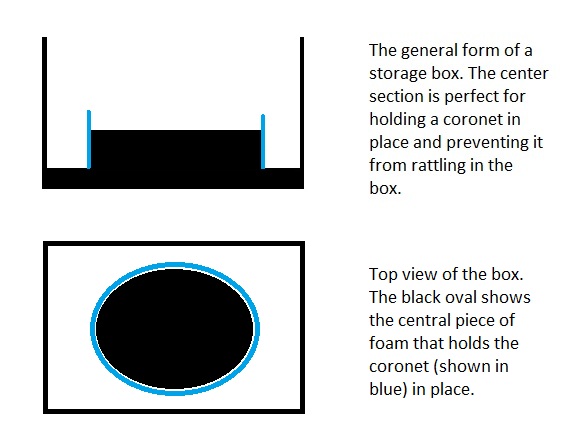
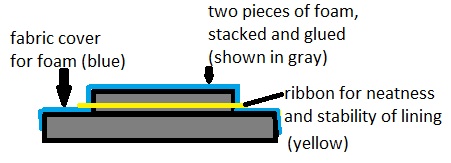
If I am using a form that is raised in the center, I glue the fabric in place on the foam and then tie a ribbon at the bottom of the center piece of foam for both appearance and sturdiness. The ribbon can be hot glued in place – be careful – random drips of hot glue on the lining will not look good! Or it can be pinned in place with straight pins. The pins are simply pushed through the ribbon and fabric and into the foam. I prefer to use flat headed plain metal pins – they look almost like tiny studs or nail heads. If you are concerned about the pins coming out, they can be glued in place with a tiny bit of liquid glue. I don’t usually glue them in place, but if I do I use glue that is compatible with the foam in my form and dries clear. I use as little as possible to avoid drips and smears.

foam with fabric and ribbon diagram


Enhanced by Zemanta

Part 2 – Making a Cool Storage Box : Customizing the Interior

In Part 1 we discussed how to choose a box or container. Now it is time to decide exactly HOW to store your items.

One of the basic techniques for creating safe storage for a precious item is by creating a form inside your container. Now what exactly do I mean by form? Well, if you just toss an item into a box it will rattle around. How fragile is your item? Will it shatter? Will it bend? Can it be nestled into a hole or does it have a hole in the middle that can be used to anchor it? Does it need to be secured from the top and bottom, or can you always keep the box “right side up”?

The following simple diagram shows an example of what I am talking about. The bottom of the box is lined with a piece of foam, with another piece of foam glued in the center to secure the coronet or tiara in place. I make sure that this central piece of foam is as large as possible, while still allowing the item to be removed from the form. Don’t forget that you will be covering the foam with fabric – I prefer black velveteen for coronet boxes because it provides a really nice backdrop for the shiny metal and is not too slippery. While fabric like satin looks really nice, it can drive you crazy. Remember -you need to choose your level of “crazy” and go with it!

storage box architecture

I do NOT glue the bottom piece of foam into the box – I press fix it. This means that I cut the bottom piece of foam so that it will barely fit into the bottom of the box. Why a press fit? If you want to change the décor on the inside of the box, or the design of the storage container, or if the use of the box ever changes, having glued in foam will make the “change” a serious pain. You risk damaging the box, or even losing your temper!

The next picture shows the foam glued together before the fabric has been put on top. Note the newspaper and plate under the glue gun. The glue will peel off the plate easily once it is cold and both the plate and newspaper protect the countertop. Formica countertops or tables can be damaged by a hot glue gun.

M3361S-3034

This arrangement assumes that your piece is hollow and can be anchored by a form placed inside that hollow. Some items will require that you create a hollow inside of the box for them to nest in.

inset storage


This picture is an excellent example of two items that could have been stored using a central form, but instead were inset into foam rubber.

pistol case

This example uses a plastic pistol case. It is very functional, but NOT pretty. The case comes with three layers of foam and you customize it by cutting the foam to create a good fit for your piece.

Evaluate what you need to store and figure out what the best technique is for keeping your item safe. Then pull together your supplies and start the process. A box, foam, or other padding, a hot glue gun (I use a high temp glue gun because the glue sticks better), a sharp knife and a ruler should be all that you need to get started!

Making a Cool Storage Box – Part 1- Choosing your Box

M3361S-3034

A few weeks ago I wrote a little blog about how to put a liner in a coronet so that it will fit better, and I mentioned that another thing that I usually do is make a storage box for the coronet. At first I thought, how many people actually need a box for a coronet, but then I thought well lots of people need a custom storage box!

Over the years I have made storage boxes out of all sorts of containers – sturdy cardboard boxes, cigar boxes, plastic containers, the “tubes” that good whiskey comes in – basically just about anything that was the correct size for the project. My initial interest in this area was because I enjoyed covering boxes with fabric or twine and making them look cool (that is another blog), but then I started trying to make storage that was better quality on the inside.

Most of the storage containers that I have customized recently have been made using the inexpensive wooden boxes that are available at the big box stores. The most important thing, of course, is to make sure that the container is the right size. Now this may seem simple, but you need to consider how much “extra” space you need in the container. Does the item that needs to be stored have accessories that will also need to be stored? Is there enough room for padding? How fragile is the item, and how generous does the padding need to be? Are you planning to line the inside of the lid as well as the inside of the bottom of the box?

Once you are certain that you have the right sized storage box you will need some additional supplies. The big decision is how rigid the interior of the container will be. When I make a box for any sort of crown, headpiece or tiara I usually use sturdy foam that comes in 1 inch thick sheets from Home Depot. I started using this material because I had some left over from another project, but having used a couple of other types of material it is now my preferred foam. It cuts well with a sharp knife and can easily be covered with fabric.

Some folks prefer foam rubber type products. I have not found a way to make this sort of “foam liner” pretty. If you are just looking for a box that will hold something securely, especially something fragile, soft foam can be an excellent choice.

When you are choosing your interior materials you need to decide how you will hold them in place. I prefer a high temp hot glue gun. Before I work with any material that I haven’t used before I always check the glue to make sure that it will stick and not melt the foam or fabric.

So grab your thinking cap, and your supplies and start planning out your new storage box.