Chains! Part 2

So last time we talked a little about basic chains. And this time we need to talk about how the links are made and cut, and what we call the chain patterns.

The process for making plain round links is a simple one. Just take a wooden dowel that is the size of the inside of the links that you want to make and wrap the wire that you plan to use around the dowel. This diagram shows the basic process. The wire in the diagram is not packed as tightly as I would normally wind it, so that you can see the separate winds. Your goal is to lay the wire completely up against the previous piece of wire as you wind it. This will give you a nice tight coil with uniform proto-links. I call them proto-links right now because they haven’t grown up to be links yet. Each wrap of the wire will become a link.

sawing links

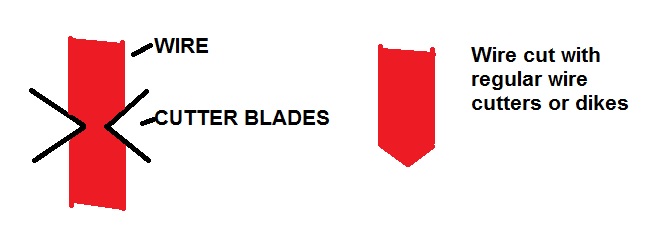
You will need a jewelers saw to cut the links properly. A jeweler’s saw basically looks like a coping saw, but it has blades with very fine teeth that will make a clean, smooth cut on your wire. I always buy my saw blades in packs of 1 dozen, because you will break blades, especially when you are learning to cut links.

And now a trick or two. Before you try to cut the coil of wire into links, wrap it with masking tape or painters’ tape. It helps to keep the coil from wobbling around as much and it helps keep the links from stretching as they are cut off of the coil. It also dramatically reduces the number of saw blades that you are likely to break.

When you are ready to saw the links, just slide the coil to the end of the dowel and cut away. Don’t worry if the saw blade cuts into the end of the dowel a little. If your saw blade gets too sticky from the tape, just use some fingernail polish remover to clean off the tape glue.

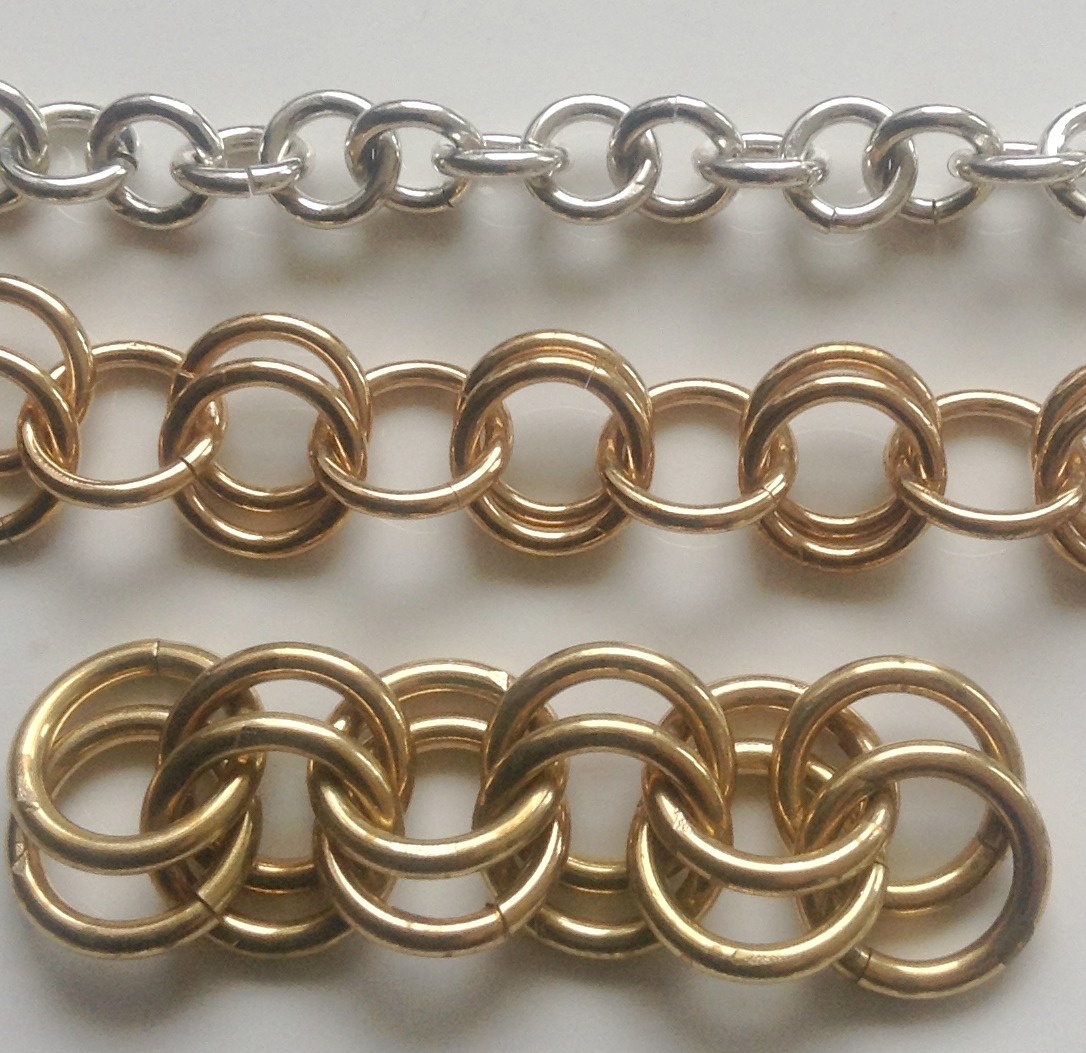
So now that we have links, we need to learn how to use them. The simplest form of chain is a one in one pattern. That simply means that one link hooks into one link. Like the top example in this picture. I just threw together three examples, they need some fine tuning before they are ready to go out into the world, but the picture shows 1 in 1, 2 in 1, and 2 in 2 pattern chains. These types of chains are all very common in pre-1600 crafts.

Chain Patterns Live

When I first went looking for good pictures of pre-1600 chains a lot of the pictures were so poor that you really couldn’t see much, but then I ran across several pieces of chains in a book called the Ancient Hungarians, which was published by the Hungarian National Museum, and suddenly I seemed to find good quality pictures of chains everywhere.

Next time we will talk about shaped chain links.

Chains Part 1

Chains!

I have had several conversations about chains lately, which means it is time to write a blog.

Some folks seemed fairly confused about what actually constitutes a period chain and what doesn’t. My personal definition of period chains relies on actual chains that I have seen in museums, or that I have located in museum databases, or books. With the advent of digitized databases, and Pinterest, there is no longer any excuse for not being able to locate good pictures of actual chains.

Most period chains are made of drawn wire. Now drawn wire simply means that they made it themselves – a piece of metal was hammered down in size until it was small enough to be pulled through a draw plate, and this process actually produced wire (this is obviously a simplified version of the process). It is possible to add cast pieces into chains, and using cast pieces as a part of chains is a common practice that goes waaay back. This Roman bracelet from the Backworth Treasure, in England (1st-2nd century AD), is a classic example of a complex chain that includes formed beads on wire links, and a cast piece as part of the chain.

But how is a chain made? Well, first you need to have links. For simple linked chains, the wire is wrapped on a dowel or other mandrel, individual links are cut, and then those links are joined together to form a chain. This diagram shows how a basic chainmail style chain is made.

Making a Simple Chain


Now something that is VERY important to notice is that the ends of the open links are not pointed. I have never, and I do mean NEVER seen a pre-1600’s chain that had pointy ends on the links. On larger, shaped links, I have seen tapered ends, but we will talk about that later.

Modernly many folks feel that the easiest way to produce links to make a chain is with some sort of wire cutter. And what sort of ends does a regular wire cutter produce on wire?

wire cut with dikes

Now, largely because this is a very easy way to make a lot of links in a short period of time, I often have crafters argue with me that this should be an acceptable technique to use. OK. The first time someone wears something that is made with this technique, and it ruins their clothes by catching, scratching and tearing at their clothes, how cool is that? Even if your points are not sharp enough to do damage, the look is just not correct if you are trying to make something look really pre-1600s. It is really not that hard to do it the correct way.

I remember learning to cut links the correct way a very long time ago. I was working with another jeweler and she wanted to use nicely cut links to teach a class, and it was my job to cut the 500 links. Fortunately she showed me a simple technique to cut the links.

Next time: How to make and cut links, and what we call the chain patterns

Hot! Hot! Hot! Part 5

So last time we were biting our nails wondering what would happen when the guys who were working on the Iron Smelting Furnace finally opened it! Well, first, let us give credit where credit is due! The smelting furnace, also called a bloomery, was created and operated by Otuell, Erikr, and Damales.

Second, you need to understand the next steps in the process (the steps that I list are a rough approximation of the process and are only used in small scale production like this one). So, when a smelting furnace is opened, the iron should have melted out of the iron ore and formed what is called a bloom. This is just a mass of iron; porous and usually with slag around the outside. This bloom is removed from the furnace and placed in a blacksmith’s forge, and the air flow is increased to increase the heat and prepare the bloom for consolidation. This consolidation is accomplished by a considerable amount of hammering (forging) with a sledge hammer, followed by reheating, and more hammering. This process causes the slag to break off and the metal to be welded together into a solid mass. This process is repeated over and over again until the iron is “ready”.

Having watched this process at Great Western War, all I can say is Wow! The fact that all of this process was occurring after dark made it equally impressive because it was easy to see the sparks flying and the glow of the forge and the bloom.

So first let’s take a look at the first good photo that I have of the bloom. Notice the large glowing mass in the picture? Well, that is it! I believe that it had already been hammered on once when this picture was taken, so it started out even bigger.

bloom at the beginning cropped

Then it goes back into the forge and the airflow is increased. Very impressive.

iron in the forge 2 cropped

And this is what it looks like when it is pulled out of the forge with a pair of long handled tongs and the hammering continues. Sparks everywhere!

forging with lots of sparks cropped

And now a couple of videos, just to show a few of the challenges that the workers faced. This short one shows a little hammering, and an unsuccessful transfer back to the forge for more heat. The person on the far left is actually using hose to put out any sparks and cool the many pieces of random slag that flew around.

Video of hammer and drop

This longer video allows you to hear the change in pitch as the iron is consolidated. You can hear the hammer sounds take on a much more solid tone. You also get to see some rather large pieces of slag fly off and be wet down, and here the cry of “slag be gone!”

slag be gone

And in this last video we can see the bloom consolidations, being turned and hammered. The background conversation discusses the process. I have other videos, but the intelligent conversation in this one beat out some of the funnier adult conversations.

last forging video with conversation

I hope that this gives you an idea of just how much work went into the process! This is how iron was produced for a very long time. It really makes you understand why iron was such a valuable commodity.