Chains! Part 3

Last time we talked about making basic round links and cutting them, and three of the most basic and common chain patterns. After I wrote that, and posted it, I realized that I had forgotten one of the coolest pre-1600 chain patterns – the twisted chain.

Now this chain pattern differs from all the other patterns that I have mentioned in one very important way. The pattern has to be created as a continuous loop. It depends on the tension that is created by the loop of the chain to create the twist in the chain.

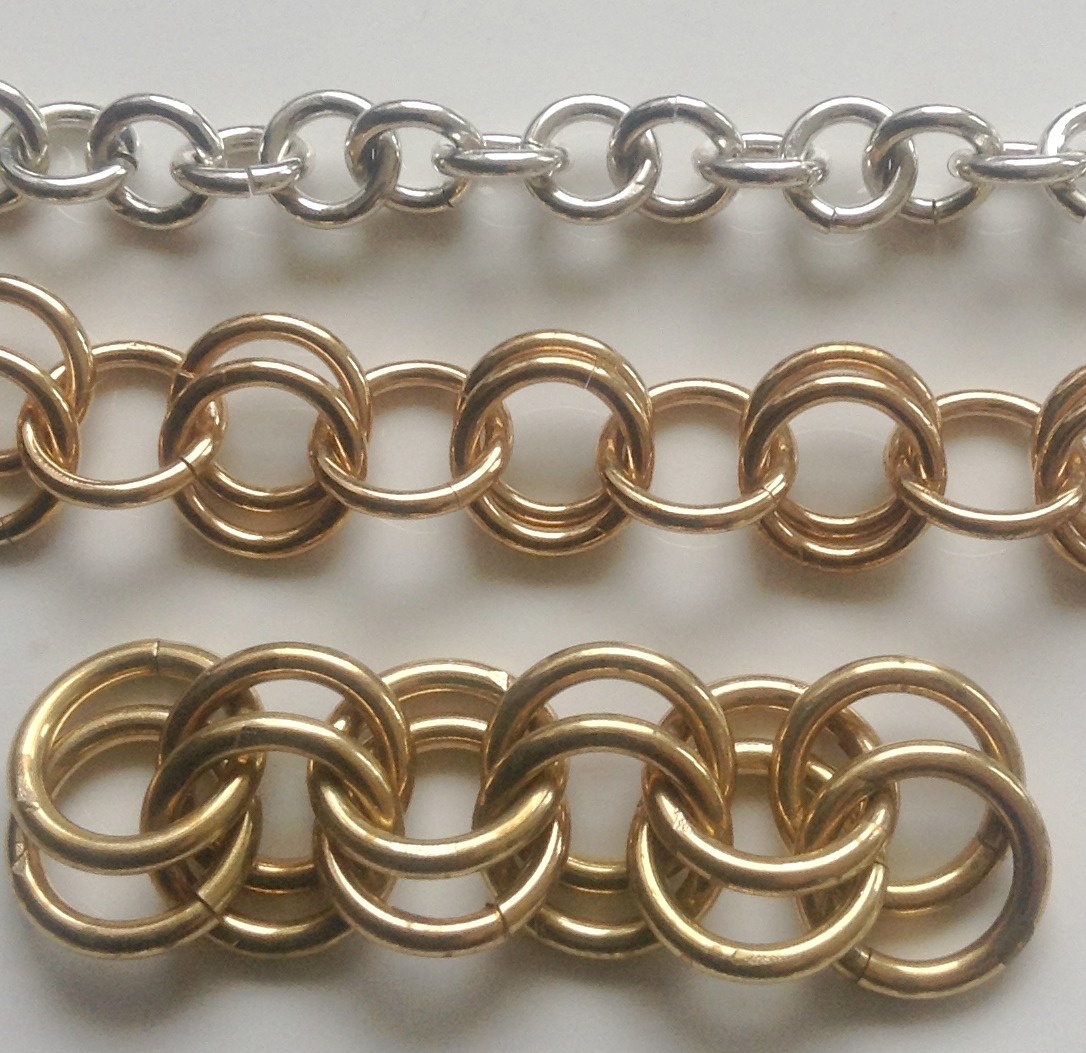
Now I confess, I am not going to try to teach you how to create this chain, but I will show you a picture of it. I purposefully chose two chains made from different sized links to show how different the chain can look, depending on the link size.

two twisted chains

Some of you are probably wondering why I have not mentioned the infamous Byzantine chain. I have had this conversation with several very serious researchers, and the reason for all of us is the same. We can’t find an example of a pre-1600 Byzantine chain. Now this could change at any time of course, but for now. The Byzantine chain, as cool as it may be, is NOT on my list of pre-1600 chain patterns.

So back to what I was supposed to be talking about – shaped chain links. I am going to divide this category into two parts, links that start out as rounds and are changed in some way, and links that may never have been round. Now, that may sound a bit vague, but I think it will make sense in the long run.

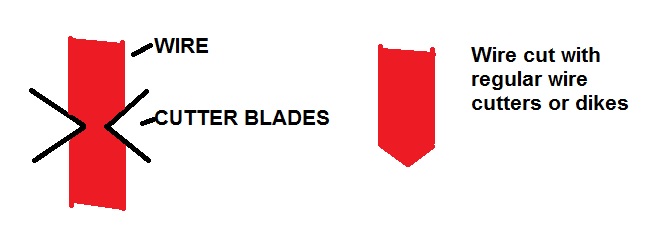
The most common “used to be round” links are used in a technique called Loop in Loop. It starts the same way, wrapped wire on a dowel, and then the wire is cut to create a link. And here is where everything changes – instead of just closing the link with a couple of pairs of pliers and using it, the link is closed, and then it is soldered closed. The link is then formed, and the formed links are woven together.

When I do this in my shop I actually use a pair of pliers to stretch the individual links. There are many different shapes that the links can be formed into. This diagram shows the simplest form of this chain. This chain is very strong because the links are soldered and more than one wire goes through each link connection.

Loop in Loop chain


This type of loop-in-loop forms a very simple linked chain. The actual shapes of the wires can easily be seen. But more complex forms of this chain can create very complex interwoven shapes that actually resemble wire weaving. A considerable number of the modern Balinese silver chains, the ones that almost look like a snake chain, are made this way. I found an example of a Roman chain at the Metropolitan Museum of Art that shows the form of the loop beautifully. If you click on the four arrows it will make the picture full screen. And yes, this was a very lucky chain because it had both a crescent and a phallus pendant on it.

And this Greek necklace is a much finer version of a loop in loop chain.

Next time – what sort of other shaped chains do we find?

Chains! Part 2

So last time we talked a little about basic chains. And this time we need to talk about how the links are made and cut, and what we call the chain patterns.

The process for making plain round links is a simple one. Just take a wooden dowel that is the size of the inside of the links that you want to make and wrap the wire that you plan to use around the dowel. This diagram shows the basic process. The wire in the diagram is not packed as tightly as I would normally wind it, so that you can see the separate winds. Your goal is to lay the wire completely up against the previous piece of wire as you wind it. This will give you a nice tight coil with uniform proto-links. I call them proto-links right now because they haven’t grown up to be links yet. Each wrap of the wire will become a link.

sawing links

You will need a jewelers saw to cut the links properly. A jeweler’s saw basically looks like a coping saw, but it has blades with very fine teeth that will make a clean, smooth cut on your wire. I always buy my saw blades in packs of 1 dozen, because you will break blades, especially when you are learning to cut links.

And now a trick or two. Before you try to cut the coil of wire into links, wrap it with masking tape or painters’ tape. It helps to keep the coil from wobbling around as much and it helps keep the links from stretching as they are cut off of the coil. It also dramatically reduces the number of saw blades that you are likely to break.

When you are ready to saw the links, just slide the coil to the end of the dowel and cut away. Don’t worry if the saw blade cuts into the end of the dowel a little. If your saw blade gets too sticky from the tape, just use some fingernail polish remover to clean off the tape glue.

So now that we have links, we need to learn how to use them. The simplest form of chain is a one in one pattern. That simply means that one link hooks into one link. Like the top example in this picture. I just threw together three examples, they need some fine tuning before they are ready to go out into the world, but the picture shows 1 in 1, 2 in 1, and 2 in 2 pattern chains. These types of chains are all very common in pre-1600 crafts.

Chain Patterns Live

When I first went looking for good pictures of pre-1600 chains a lot of the pictures were so poor that you really couldn’t see much, but then I ran across several pieces of chains in a book called the Ancient Hungarians, which was published by the Hungarian National Museum, and suddenly I seemed to find good quality pictures of chains everywhere.

Next time we will talk about shaped chain links.

Chains Part 1

Chains!

I have had several conversations about chains lately, which means it is time to write a blog.

Some folks seemed fairly confused about what actually constitutes a period chain and what doesn’t. My personal definition of period chains relies on actual chains that I have seen in museums, or that I have located in museum databases, or books. With the advent of digitized databases, and Pinterest, there is no longer any excuse for not being able to locate good pictures of actual chains.

Most period chains are made of drawn wire. Now drawn wire simply means that they made it themselves – a piece of metal was hammered down in size until it was small enough to be pulled through a draw plate, and this process actually produced wire (this is obviously a simplified version of the process). It is possible to add cast pieces into chains, and using cast pieces as a part of chains is a common practice that goes waaay back. This Roman bracelet from the Backworth Treasure, in England (1st-2nd century AD), is a classic example of a complex chain that includes formed beads on wire links, and a cast piece as part of the chain.

But how is a chain made? Well, first you need to have links. For simple linked chains, the wire is wrapped on a dowel or other mandrel, individual links are cut, and then those links are joined together to form a chain. This diagram shows how a basic chainmail style chain is made.

Making a Simple Chain


Now something that is VERY important to notice is that the ends of the open links are not pointed. I have never, and I do mean NEVER seen a pre-1600’s chain that had pointy ends on the links. On larger, shaped links, I have seen tapered ends, but we will talk about that later.

Modernly many folks feel that the easiest way to produce links to make a chain is with some sort of wire cutter. And what sort of ends does a regular wire cutter produce on wire?

wire cut with dikes

Now, largely because this is a very easy way to make a lot of links in a short period of time, I often have crafters argue with me that this should be an acceptable technique to use. OK. The first time someone wears something that is made with this technique, and it ruins their clothes by catching, scratching and tearing at their clothes, how cool is that? Even if your points are not sharp enough to do damage, the look is just not correct if you are trying to make something look really pre-1600s. It is really not that hard to do it the correct way.

I remember learning to cut links the correct way a very long time ago. I was working with another jeweler and she wanted to use nicely cut links to teach a class, and it was my job to cut the 500 links. Fortunately she showed me a simple technique to cut the links.

Next time: How to make and cut links, and what we call the chain patterns