Casting Metal: Soapstone Molds – Part 5 – My Piece is Not Casting Well – What do I do next?

Diagnosing why a pewter piece is not casting correctly, without looking at the mold, is not easy. But there are a series of things that I always go through when I am having trouble with a mold. It is a process of elimination. Eliminate all of the potential problems and the piece should cast properly.

First, let’s look at the metal. Every metal alloy has a specific temperature at which it pours properly. Are you getting your metal hot enough? Does it flow well? Are you transferring the metal quickly from the melting pot to the mold? Are you getting your metal too hot? Metal that is too hot will put off a lot of fumes, which means that you are actually cooking off some the metal. This is not good for you or the metal.

Next let’s look at the general form of the mold. Do the two sides of the mold fit together properly? Does the metal leak out? If the metal is leaking out somewhere, and you are clamping it properly, then the faces of the mold – the two surfaces that are supposed to fit together – are not surfaced properly. You will need to resurface the mold to make the surfaces fit properly.

Is the funnel and the sprue large enough to allow the pewter to flow properly into the mold cavity? If the two sides of the sprue are not symmetrical or the sprue channel is not smooth enough the roughness of the mold may cause turbulence in the metal flow that will prevent the mold from filling completely. The inside of the funnel and sprue should be as smooth as you can make them and uniform. Be sure that the sprue does not narrow towards the cavity of the piece and that the transition between the sprue and the mold cavity is smooth.

Is air being trapped in the mold and preventing the metal from getting into the details of the mold? Before you consider making any permanent modifications to the mold try dusting the inside of the mold with caster’s talc or graphite dust. Simply use a small brush and lightly brush the entire inside of the mold with the powder. Sometimes that is all it takes to make a mold cast properly.

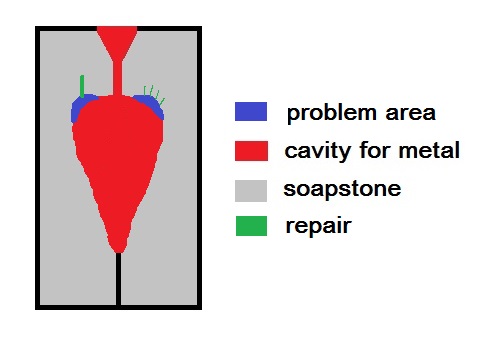
If this does not work it may be necessary to carve very shallow lines, about the diameter of two hairs away from the edge of the mold cavity to allow the air to escape from the mold. in some cases a larger channel, called a riser may be necessary if large quantities of air are trapped.

This graphic shows a couple of examples of air being trapped because of the design of the piece. The use of either shallow cut lines, or a riser should fix the problem.

soapstonemoldproblemsIf you have run through all of these points, and the mold is warmed up, and the piece is still not casting, it may be time to enlarge the size of the sprue or the funnel area. Begin by enlarging the funnel area, and then if the problem is not fixed, enlarge the diameter of the sprue.

I hope that you find this information useful in helping you to improve your pewter casting. This series was not intended to be a comprehensive reference to pewter casting, but rather an aid to understanding the process.

Casting Metal: Soapstone Molds – Part 4: Pouring the Metal and Perfecting the Mold

OK, so you have your mold ready, you are wearing safety equipment, and you have your metal melted. Now what? I highly recommend clamping the mold closed with something that will not burst into flame if you pour molten pewter on it. You do not need to use a lot of pressure, but the mold pieces do need to be properly aligned and held together. My most common arrangement is a couple of spring clamps that hold everything neatly in place. You can use C clamps, but be careful not to apply too much pressure to the mold, you do not want to crack it. Experienced pewterers will often simply hold the mold closed with a heat resistant glove on and pour the metal. I have done it many times myself, but one of the problems is that the mold will become progressively hotter as you pour each piece. If you are pouring a lot of molds at once, the molds will have some time to cool down, but it you are only pouring one or two molds the molds will quickly become too hot to hold and you will be at risk of dropping the mold, which could break the soapstone.

These are the types of clamps that I use.

Why clamp the mold? It allows you to keep your hands completely out of the way of the molten metal. Most people will use a small metal ladle with a spout to scoop up and pour the metal from the melting pot into the mold. Whether you are doing that, or simply pouring from the container in which you melted the metal into the mold it is inevitable that at some point you will spill some molten metal outside of the mold. That is why the surface on which the mold rests while you fill it needs to be non flammable, and you need to have your hands out of the way.

Pour molten pewter into the mold until it is full. Wait for the metal to cool down and re-solidify. If you jiggle the mold a lot at this stage you risk creating a grainy unusable product. Leave the mold alone. If you watch the metal cool you will see it go from shiny to dull. Give it several more minutes, and then open the mold. Both the mold and the casting will be HOT.

The chance that your piece will pour perfectly the first time that you try it is slim. If it does, and continues to pour well, congratulations! You have completed your first soapstone mold.

If the piece does not cast well, try again. Make careful observations. Does the casting improve as the mold warms up? Does it seem as if there is enough metal? The sprue and funnel area should be completely filled with metal. If they are not, are you pouring the metal directly into the funnel portion of the sprue? Is the metal hot enough? If the metal is too cool it will be more viscous and not flow as well.

Next Time: My Piece is Not Casting Well – What do I do next?

Casting Metal: Soapstone Molds – Part 3 – Carving the Block and Getting Ready to Pour the Piece

Once you have worked out the details of placing your design within the blocks, and transferred the design, you need to start carving. Many people will actually do the carving of the designs for the molds under water. I don’t always do the carving completely underwater, but I do dip the stone in water regularly to reduce the amount of dust that gets into the air, and I always wear a dust mask.

Soap stone is soft enough to be carved with sharp items like dental tools or sharpened nails, or modern tools like diamond burs and dremel-style electric tools. I suggest experimenting on a scrap piece of soapstone before you actually work on your mold. Make sure that you understand how much pressure it takes to actually carve the stone. Different batches of stone can have different hardnesses. Figure out how your tool behaves, and how you can control the tool so that it does not slip. Be careful to be aware of your hand placement so that you can’t accidentally stab yourself if the tool does slip. You may find that a piece of the weird rubbery drawer liner that they sell will help to keep your block from sliding around as you carve it. Remember, carving soapstone is a skill that takes practice and patience.

One of the dangers of carving soapstone in water is the water itself. The soapstone must be 100% dry before you use it to cast in. Let me repeat that – 100% dry. If there is any water left in the mold you risk cracking the soapstone from thermal shock, or even worse, what I call a “volcano”. This is when molten metal and steam shoots straight up in the air. This is EXTREMELY dangerous and can result in some really nasty burns.

So now you have carved your soapstone mold. You have double checked it to make sure that there are NO undercuts in the mold, and that the mold is completely dry. If you have any doubt about the mold being dry you can lay the pieces, inside surface up, in a cookie try in a conventional oven at the lowest setting for an hour. It is your job to be safe.

English: Chunks of pewter from a pewter spoon

English: Chunks of pewter from a pewter spoon (Photo credit: Wikipedia)

I use a small electric furnace to melt my pewter. You can purchase small cast iron pots, shaped like small saucepans with a spout, for melting pewter. I only use lead free pewter. True pewter contains lead, which can be a serious health issue. If the pewter is overheated the lead will cook off as a vapor. This is dangerous. As a merchant who sells in multiple states around the US, I must conform to standards for lead in jewelry. Not having any lead makes it a LOT easier, and safer.

Now it is time to set up for your first pour. Heavy insulating gloves, like welding gloves, and eye protection are a good idea. I wear either a leather apron or a cotton welding apron and closed toed leather shoes. My hair, which is long, is pulled back out of the way and I usually wear cotton blue jeans. This may all seem excessive, but metal that is 500 to 600 degrees can leave a nasty burn.

Next time: Pouring the Metal and Perfecting the Mold