
The original documentation that I wrote for this leather purse with metal frame project was intended to be read while actually viewing the purse. So I decided that I needed to write another article which included pictures of the purse. Unfortunately I did not have a digital camera at the time that I made the purse, so there are no “in progress” shots, but I still have the purse and have used it for many years. I learned a LOT from making this purse, including what I will do differently next time!
Since I made this leather purse with metal frame, I have seen even more types of purse frames, including purse hangers. Museums and curators often describe both purse frames and purse hangers as “cast.” Some purse frames and purse hangers are definitely completely cast, but I think that parts of the plain purse frames are just hand formed. They did cast many of the pieces that I soldered together as one piece. Soldering was a difficult process in period, so casting in one piece and riveting things together were the preferred techniques. I used silver solder to put things together, but much “low end” period soldering was done with tin and lead solders.
The leather purse with metal frame that I made is too big for me. It has a natural tendency to collect ten pounds of “stuff”, something that I have never liked even in the “real world”. The actual size of the purse lid is 7 1/16 inches wide by 5 1/16 inches tall. The purse bag portion is almost 9 inches deep with a bottom insert of 9 ¾ by 3 3/8 inches.
When I made the purse lid, I was concerned about it opening and things falling out. So I added a hand made leather toggle and a handmade silk tie to wrap around the toggle. What I discovered is that I never use it! It is just in the way when I want to get into the purse in a hurry. The weight of the purse lid and purse frame tends to naturally hold the purse closed. I suppose if I did a lot of jumping jacks or running, the flopping around that 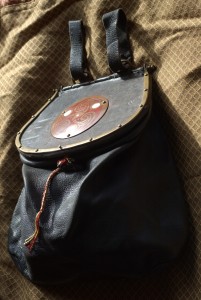 ensued might allow things to fall out. Under normal walking conditions the purse lid stays closed. If I were to put LARGE things into the purse so that it barely closes, I would use the leather toggle and silk tie. I would also use it if I was concerned about pick pockets.
The first picture that I am including is of the purse in the position that it is in when it is on my belt. The picture shows what I mean about a natural tendency to stay closed. The pivot of the purse lid is against my body and supported by the leather loops, so the purse frame and purse lid tend to naturally hang down flat.
The next picture shows the purse lid. You can see the frame and rivets clearly. The 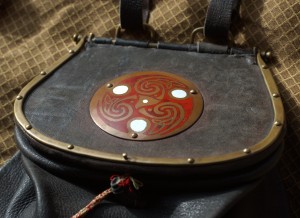 enameled piece is also riveted in place. The rivet that sticks up in the middle of the edge of the purse frame is bent over on the other end to form a loop, and the tie (handmade red and yellow silk cord) is tied to this loop.
The inside of the lid, showing the birch board, the long rivet that has been turned into a 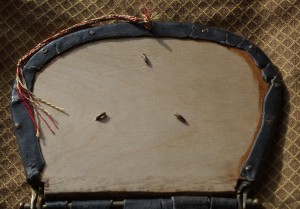 loop, the silk cord, the peaned over rivets that hold the enameled medallion in place and the more neatly finished rivets around the edges that hold the frame to the lid.
An up close shot of the hinge area. The support bar is slightly bent from use (it is about 12 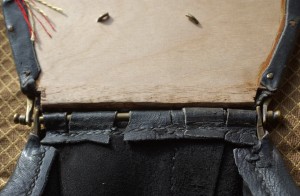 years old), but it was originally straight. The distance from the end of the finial on the left end of the support bar to the end of the finial on the right end is 5 7/8 inches. You can see where the upper and lower portions of the purse frame fit on to the support bar and allow it all to become a big hinge.
