Part 2 – Making a Cool Storage Box : Customizing the Interior

In Part 1 we discussed how to choose a box or container. Now it is time to decide exactly HOW to store your items.

One of the basic techniques for creating safe storage for a precious item is by creating a form inside your container. Now what exactly do I mean by form? Well, if you just toss an item into a box it will rattle around. How fragile is your item? Will it shatter? Will it bend? Can it be nestled into a hole or does it have a hole in the middle that can be used to anchor it? Does it need to be secured from the top and bottom, or can you always keep the box “right side up”?

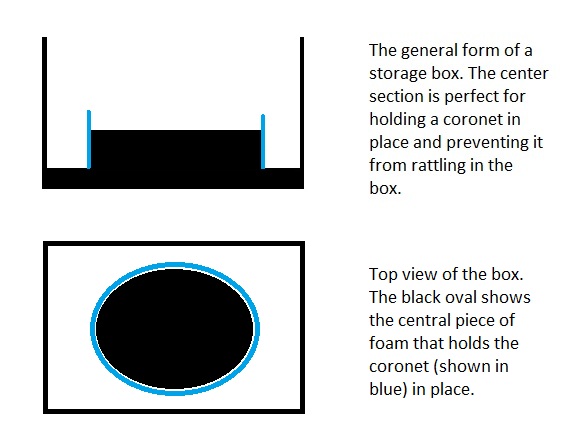
The following simple diagram shows an example of what I am talking about. The bottom of the box is lined with a piece of foam, with another piece of foam glued in the center to secure the coronet or tiara in place. I make sure that this central piece of foam is as large as possible, while still allowing the item to be removed from the form. Don’t forget that you will be covering the foam with fabric – I prefer black velveteen for coronet boxes because it provides a really nice backdrop for the shiny metal and is not too slippery. While fabric like satin looks really nice, it can drive you crazy. Remember -you need to choose your level of “crazy” and go with it!

storage box architecture

I do NOT glue the bottom piece of foam into the box – I press fix it. This means that I cut the bottom piece of foam so that it will barely fit into the bottom of the box. Why a press fit? If you want to change the décor on the inside of the box, or the design of the storage container, or if the use of the box ever changes, having glued in foam will make the “change” a serious pain. You risk damaging the box, or even losing your temper!

The next picture shows the foam glued together before the fabric has been put on top. Note the newspaper and plate under the glue gun. The glue will peel off the plate easily once it is cold and both the plate and newspaper protect the countertop. Formica countertops or tables can be damaged by a hot glue gun.

M3361S-3034

This arrangement assumes that your piece is hollow and can be anchored by a form placed inside that hollow. Some items will require that you create a hollow inside of the box for them to nest in.

inset storage


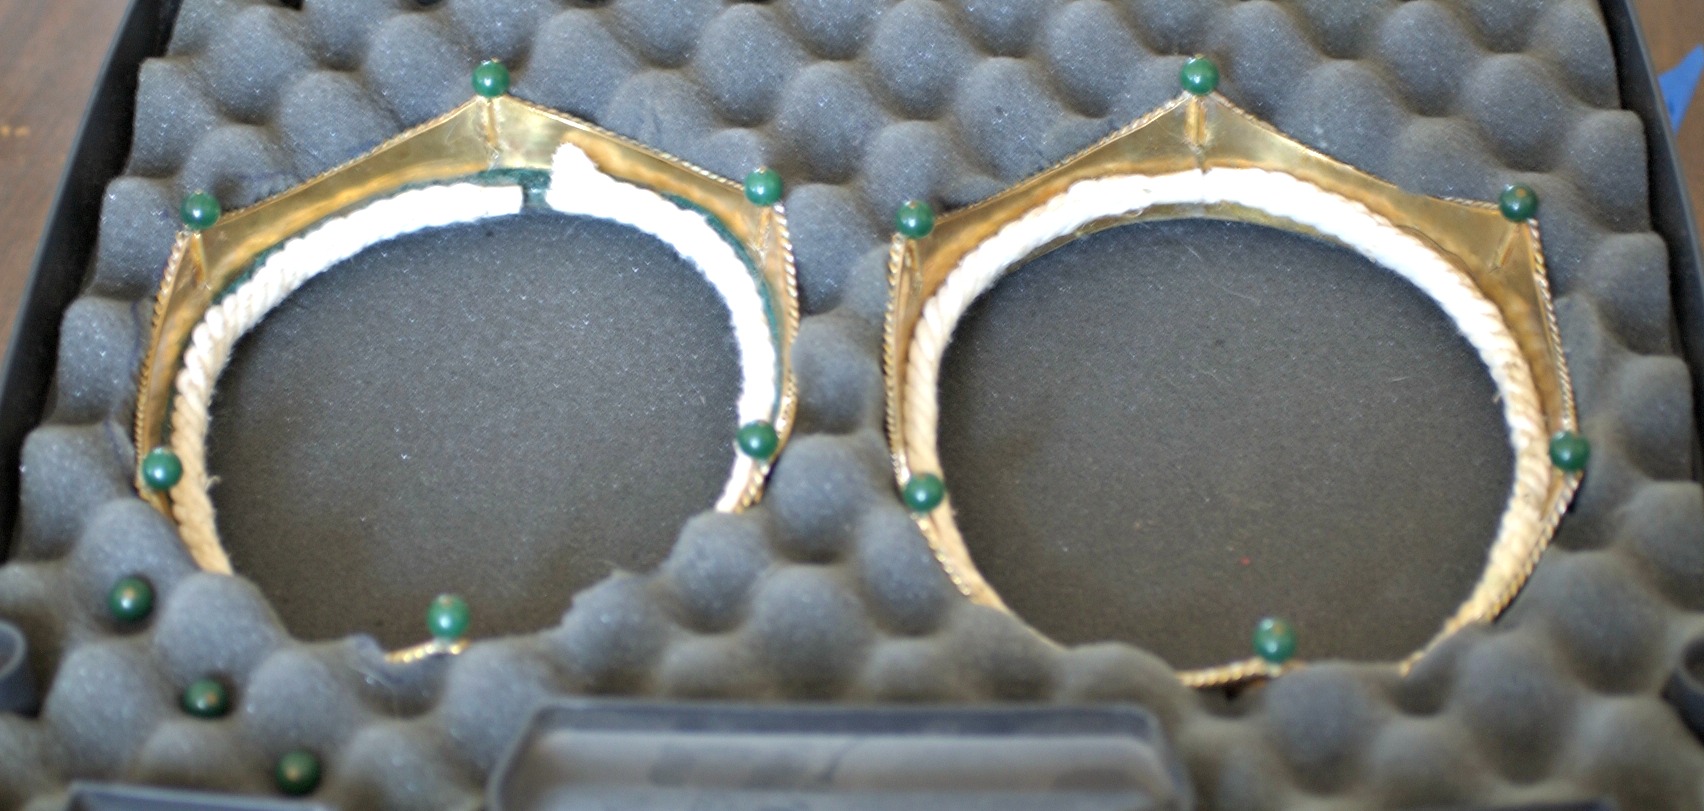
This picture is an excellent example of two items that could have been stored using a central form, but instead were inset into foam rubber.

pistol case

This example uses a plastic pistol case. It is very functional, but NOT pretty. The case comes with three layers of foam and you customize it by cutting the foam to create a good fit for your piece.

Evaluate what you need to store and figure out what the best technique is for keeping your item safe. Then pull together your supplies and start the process. A box, foam, or other padding, a hot glue gun (I use a high temp glue gun because the glue sticks better), a sharp knife and a ruler should be all that you need to get started!

Making a Cool Storage Box – Part 1- Choosing your Box

M3361S-3034

A few weeks ago I wrote a little blog about how to put a liner in a coronet so that it will fit better, and I mentioned that another thing that I usually do is make a storage box for the coronet. At first I thought, how many people actually need a box for a coronet, but then I thought well lots of people need a custom storage box!

Over the years I have made storage boxes out of all sorts of containers – sturdy cardboard boxes, cigar boxes, plastic containers, the “tubes” that good whiskey comes in – basically just about anything that was the correct size for the project. My initial interest in this area was because I enjoyed covering boxes with fabric or twine and making them look cool (that is another blog), but then I started trying to make storage that was better quality on the inside.

Most of the storage containers that I have customized recently have been made using the inexpensive wooden boxes that are available at the big box stores. The most important thing, of course, is to make sure that the container is the right size. Now this may seem simple, but you need to consider how much “extra” space you need in the container. Does the item that needs to be stored have accessories that will also need to be stored? Is there enough room for padding? How fragile is the item, and how generous does the padding need to be? Are you planning to line the inside of the lid as well as the inside of the bottom of the box?

Once you are certain that you have the right sized storage box you will need some additional supplies. The big decision is how rigid the interior of the container will be. When I make a box for any sort of crown, headpiece or tiara I usually use sturdy foam that comes in 1 inch thick sheets from Home Depot. I started using this material because I had some left over from another project, but having used a couple of other types of material it is now my preferred foam. It cuts well with a sharp knife and can easily be covered with fabric.

Some folks prefer foam rubber type products. I have not found a way to make this sort of “foam liner” pretty. If you are just looking for a box that will hold something securely, especially something fragile, soft foam can be an excellent choice.

When you are choosing your interior materials you need to decide how you will hold them in place. I prefer a high temp hot glue gun. Before I work with any material that I haven’t used before I always check the glue to make sure that it will stick and not melt the foam or fabric.

So grab your thinking cap, and your supplies and start planning out your new storage box.

Wrist Clasps – What are they and How to use them

What are Wrist Clasps, how are they used, and who used them?

First of all – what is a wrist clasp?

Etsy 38 close

This is an example of a formed metal sheet wrist clasp set.

The mechanism of a wrist clasp is a metal hook and eye closure. The closure is used to close the wrist opening on a tunic. Now wrist clasps are not all literally hook and eyes in appearance, but that is how they function – there are two pieces to each clasp, a hook plate and an eye plate. The Wrist Clasp sets can be cast, formed sheet metal, or formed wire.sheet metal wrist clasp


When I first began investigating Wrist Clasps I read an article online about how reenactors hated to wear Wrist Clasps because they were hard to use and they didn’t stay closed. Well, I thought about that for a while and decided that there was probably a good chance that someone was doing something wrong with the way the clasps were being used. Now first let me say that I am probably much older than most of my readers. I remember when wearing stockings meant wearing a garter belt, not because you were trying to be sexy, but because that was what there was – panty hose had not been invented yet. So, I have the concept of things being a bit fussy, particularly things associated with women’s clothing and even more specifically dressy women’s clothing. But if a thing is going to be used, it must be functional. It may require some occasional adjustments, but it must be functional.

Now, one of the problems that we have as reenactors is knowing what people wore on an everyday basis, verses what they were buried in. I never knew that my grandfather had a suit until I was at his funeral. He was buried in a suit, but never in my 14 years of knowing him had I ever seen him wear a suit. Did Vikings and Anglo Saxons wear wrist clasps in everyday life, or just for “fancy wear”? Well, in all honesty we really can’t be sure. If we assume that most folks did not have a large selection of clothing and wrist clasps were considered to be a regular part of a decently dressed individual’s clothing, then the wrist clasps had to function. So what were the reenactors doing wrong?

I made a copy of a basic sheet metal wrist clasp, and I played with it. And it worked. It worked just fine. I have a tunic with wrist clasps on the cuffs. They are a little hard to close, but they usually stay closed all day, without any adjustments. They are not uncomfortable. I had someone explain to me that Wrist Clasps were uncomfortable because the metal dug into their wrists when they leaned on a table. How much time did Vikings and Anglo Saxons spend leaning on a table? I don’t spend much time at all leaning on a table. I designed my sleeves to open along the outside edge of my wrist, so that the wrist clasps would show when my arms hung down straight. I made the sleeves fairly tight at the wrist, so that closing the clasps was a bit difficult, and the tightness of the sleeve held the hook of the Wrist clasps firmly in the “eye” of the receiver plate. They worked. They worked just fine.

From a historical standpoint, Wrist Clasps are considered to be an important piece of dress accessories for both Vikings and Anglo Saxons. Wrist clasps appear to have originated in Scandinavia.  They were brought to Great Britain in about 475AD, probably by Norwegian Vikings. While commonly called “Wrist Clasps”, some people think that Viking men in Scandinavia used them as both wrist and ankle closures. I have not seen definitive proof of this. Women wore clasps at the wrist and the bosom, and also occasionally appear to have used clasps to close pouches. Traditionally it was believed that once the Vikings arrived in Great Britain, only the women continued to wear the clasps. One of the problems with this conclusion is that recent DNA research shows that the majority of Viking men who settled in Great Britain took local wives, who would have been Anglo Saxon. Anglo Saxon woman wore wrist clasps.

Among Anglo-Saxons the wrist clasps were often used in combination with tablet woven bands on cuffs and in some areas (Lincolnshire) leather bands replaced the tablet weaving. In the East Anglia and Cambridgeshire regions an additional triangular piece of metal, known as a “gusset plate” was used to cover the slit area of the sleeve opening.

seam gusset and clasp

Another interesting difference between Viking and Anglo-Saxon use of the wrist clasp was the method by which the clasps were attached. The Anglo-Saxon women sewed their clasps on, while in Scandinavia the clasps were frequently riveted to the clothing.

Vikings and Anglo-Saxons have three types of Clasps in common:

  1. Basic Hook and Eye Form
  2. Cast geometric or zoomorphic form
  3. Formed Metal sheet rectangular clasps

Here is an example of a simple cast Anglo Saxon Wrist Clasp Set