Wire Weaving – Not as Simple an Issue as it Seems – Part 2

So last time I talked about taking a class at Gulf Wars and mentioned that it reorganized my thoughts on Wire Weaving and a couple of other skills. Before we can go any further everyone needs to have a basic knowledge of “Viking” Wire Weaving, Linked Chains, and Loop in Loop.

All three of these techniques use wire. For simple linked chains, the wire is wrapped on a dowel or other mandrel, individual links are cut, and then those links are joined together to form a chain. This diagram shows how a basic chain mail style chain is made.

Making a Simple Chain

Loop in Loop is a variation on the standard chain. It starts the same way, wrapped wire on a dowel, and then the wire is cut to create a link, but then the link is soldered. The link is then formed, and the formed links are woven together. This diagram shows the simplest form of this chain. This chain is very strong because the links are soldered and more than one wire goes through each link connection.

Loop in Loop chainThis type of loop-in-loop forms a very simple linked chain. The actual shapes of the wires can easily be seen. But more complex forms of this chain can create very complex interwoven shapes that actually resemble wire weaving. A considerable number of the modern Balinese silver chains, the ones that almost look like a snake chain, are made this way.

And then there is the “Viking” form of wire weaving that I learned and teach. This chain doesn’t use links, instead the wire is cut into pieces, usually 12 to 18 inches long, and the chain is “sewed” to create the structure of the chain. Here is the basic process, excerpted and abbreviated from my class notes that I use for teaching the Wire Weaving Class.

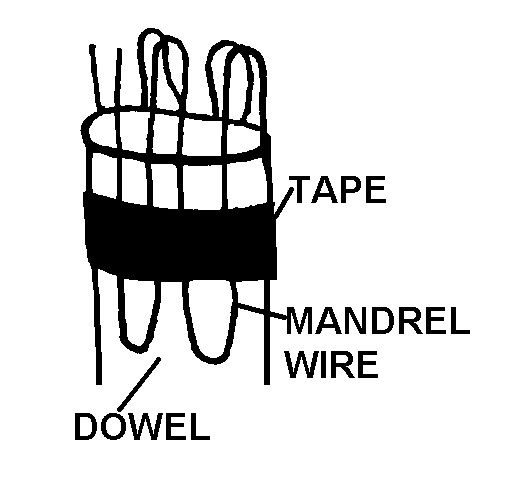
The first step in making a chain is to create a mandrel to hold the first line of loops. These mandrel loops are then spaced as evenly as possible around the mandrel and held in place with a piece of masking tape or a wire.

wire on mandrel
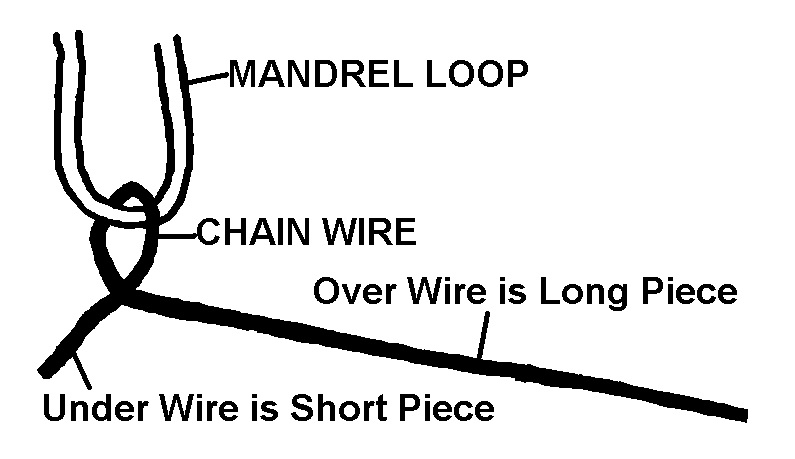
Once the mandrel is in place, cut a piece of the chain wire about 12-14 inches long and make a hook in the end of the wire that has about a ½ inch “tail”. Hook this “tail” through a loop on the mandrel and cross the tail under the remainder of the piece of wire.

mandrel loop and wire
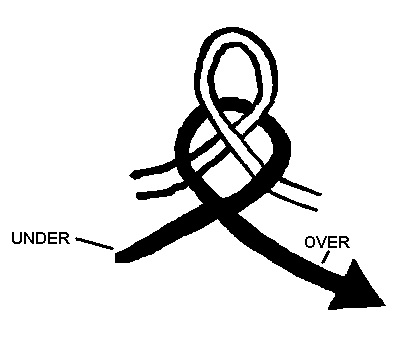
Take the free end of the wire and loop it through the next loop of the mandrel, going over the mandrel wire and then under it and cross the chain wire. Repeat this process until all of the mandrel wire loops have a wire loop in them. Try to make the loops as even as possible, but do not despair – when you draw down a chain through a draw plate the process evens out the chain more than you can possibly believe. Continue this process on the chain wire loops. Important: As the chain increases in length, slide it off of the end of the dowel so that only about an inch and a half, or two inches of the chain remains on the dowel.

wire on wire loop
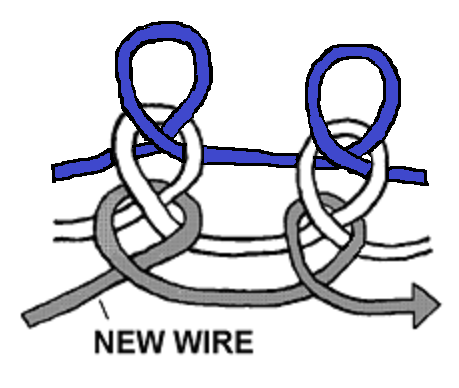
When you run out of wire, simply cut another piece about 14 inches long and piece it by adding it in the same way as the first piece. Be careful to tuck any loose ends under the following rows.

wire weavingNow, this brief explanation of how a “Viking Knit Chain” is made should give you some insights into some of the problems that we have with terminology. Can you guess what they are?

Next Time: Weaving, Nahlbinding, and Knitting

Wire Weaving – Not as Simple an Issue as it Seems – Part 1

Knit Chain has been a form that I’ve loved for 16 years. A recent class unexpectedly expanded my understanding of this technique and changed my view of some other skills, too.

Sometimes when I go to an event I wind up taking a class on a lark. Something I hadn’t planned to take. Something that just sparked a moment of curiosity. And sometimes that class can turn out to be an entirely new thing for me – a new area of study and experimentation.

Well, that happened this year for me at Gulf Wars. I was reading through the class list, and there it was – a class on Anglo Saxon Style Knit Chain.

OK.

I have been making and teaching Knit Chains, often incorrectly called Viking Wire Weaving, for about 16 years. I took a class at the Pennsic War and took my skills home with me to the West Kingdom. Many dozens of people now do this craft as a direct result of my classes – and some of my original students have gone on to perfect and teach this skill. I’ve helped dozens of others figure out how to finish or improve their pieces, so I am VERY familiar with the technique.

Since “Viking wire weaving” fascinates me, I’ve also done a considerable amount of research on the technique. I’m always looking for evidence of how these early skills were actually performed – tools, and artifacts.

Some researchers and academic papers told me that the technical name for the technique was Trichinopoly – an unfortunate term that was applied by a British Gentleman back in the late 1800’s – but more about that later. I wondered how long the technique had been used. So I started looking for other artifacts that could be credited to specific cultures and dated. Real artifacts pushed the use of the technique back to 400 BC in Turkey – waaay before the Vikings. It was surprised to find knit chains there. Wasn’t this supposed to be a Scandinavian thing? But I kept watching for more pieces, and one day I randomly happened upon a traveling exhibit of the female Pharaoh Hapshepsut ( 1479-1458 BC) from Egypt. I was wandering through, and there was a gold necklace made with this technique.

It was now very clear to me that this technique had nothing to do with the Vikings. They may have used it, but they did not appear to have invented it. In fact when I initially went to look for Viking pieces that used the technique, I couldn’t find any. I eventually did start to find them, first in Ireland and Scotland, and then in other areas, but it was really NOT that common. In the long run I discovered that the lack of consistent terminology that was used for the technique was one of the things that made it so hard to locate true knit chains. Most museums just lump the technique in with all of the other “chains”. The only way to actually tell if a piece is wire weaving is to find a good up close picture and actually figure out the pattern of the wire in the chain. Not an easy task.

Now to the individual who is used to standard chains made from links, it may seem silly that identifying something that was woven from something that was just “joined together” would be difficult, but if you understand the actual structural forms of wire weaving, and chain making, it will become obvious.

Next time: Viking Wire Weaving, Linked Chains, and Loop in Loop

Casting Metal: Soapstone Molds – Part 5 – My Piece is Not Casting Well – What do I do next?

Diagnosing why a pewter piece is not casting correctly, without looking at the mold, is not easy. But there are a series of things that I always go through when I am having trouble with a mold. It is a process of elimination. Eliminate all of the potential problems and the piece should cast properly.

First, let’s look at the metal. Every metal alloy has a specific temperature at which it pours properly. Are you getting your metal hot enough? Does it flow well? Are you transferring the metal quickly from the melting pot to the mold? Are you getting your metal too hot? Metal that is too hot will put off a lot of fumes, which means that you are actually cooking off some the metal. This is not good for you or the metal.

Next let’s look at the general form of the mold. Do the two sides of the mold fit together properly? Does the metal leak out? If the metal is leaking out somewhere, and you are clamping it properly, then the faces of the mold – the two surfaces that are supposed to fit together – are not surfaced properly. You will need to resurface the mold to make the surfaces fit properly.

Is the funnel and the sprue large enough to allow the pewter to flow properly into the mold cavity? If the two sides of the sprue are not symmetrical or the sprue channel is not smooth enough the roughness of the mold may cause turbulence in the metal flow that will prevent the mold from filling completely. The inside of the funnel and sprue should be as smooth as you can make them and uniform. Be sure that the sprue does not narrow towards the cavity of the piece and that the transition between the sprue and the mold cavity is smooth.

Is air being trapped in the mold and preventing the metal from getting into the details of the mold? Before you consider making any permanent modifications to the mold try dusting the inside of the mold with caster’s talc or graphite dust. Simply use a small brush and lightly brush the entire inside of the mold with the powder. Sometimes that is all it takes to make a mold cast properly.

If this does not work it may be necessary to carve very shallow lines, about the diameter of two hairs away from the edge of the mold cavity to allow the air to escape from the mold. in some cases a larger channel, called a riser may be necessary if large quantities of air are trapped.

This graphic shows a couple of examples of air being trapped because of the design of the piece. The use of either shallow cut lines, or a riser should fix the problem.

soapstonemoldproblemsIf you have run through all of these points, and the mold is warmed up, and the piece is still not casting, it may be time to enlarge the size of the sprue or the funnel area. Begin by enlarging the funnel area, and then if the problem is not fixed, enlarge the diameter of the sprue.

I hope that you find this information useful in helping you to improve your pewter casting. This series was not intended to be a comprehensive reference to pewter casting, but rather an aid to understanding the process.