Purses Part 1

Purses. They take many forms, they are used by all social classes, and they are an important accessory for just about everyone from at least the Late Stone Age on. The actual definition of what constitutes a purse is a more complex issue than you may think. What are the size limitations, the materials that they can be made of, the method of construction, the method of closure?

Probably the most common materials are leather and cloth, and the most common closures are a draw string or toggle. I know that for the first ten years of my life as a reenactor that describes all of the purses that I, or any of my friends had. Simple bags with drawstrings, or leather belt pouches with some sort of toggle or latch completed our need for carrying small things (like money and eyeglasses). We often had other small bags and pouches in our purses to control the chaos that tended to develop in the purses.

Now that is not a complaint or any sort of put-down. Some of these purses, were truly lovely, embroidered pouches with silver spangles and tassels, leather belt pouches with leather tooling, appliqué, studs, or lacing. Totally documentable, and something that anyone should be proud to wear.

There are some excellent resources out there for people who are interested in making a reproduction of one of these types of purses. Archaeological reports often have very good pictures or drawings of the purse patterns. Probably the most notable collection of solid archaeological information on purses, that has been made much more user friendly with the inclusion of photographs, drawings, Medieval illustrations and good explanations is “Purses in Pieces” by Olaf Goubitz. Although the book focuses on the Archaeology of the Netherlands, the purse forms are fairly universal throughout Europe, just as any important accessory would be today. As a side note, the reason so much leather survives in the Netherlands is because of the soil conditions. The naturally wet conditions often preserve the leather instead of causing it to rot. We find the same sorts of preservation of leather and wood in the Novgorod (Russia) “black earth” areas.

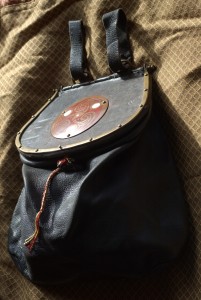
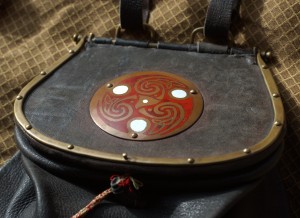
As I mentioned before, the size and materials that an item is made of might also define its name. At what point does a purse become a Pilgrim’s bag? At what point does a net bag become Shepherd’s purse? But I have to admit that my plan is to leave that discussion for another place and time. Despite the fact that the purse forms that I have mentioned are very common in Medieval Illustrations they are definitely NOT the only form of the purse that we see represented. What interests me, and in fact has become something of a research obsession for me, is purses with frames.

Now that may seem a bit confusing at first, but most people are familiar with at least one purse that has a frame, the elaborately decorated purse lid from the Sutton Hoo burial.

Purse-lid from the Sutton Hoo ship-burial 1, E...

Purse-lid from the Sutton Hoo ship-burial 1, England. British Museum. (Photo credit: Wikipedia)


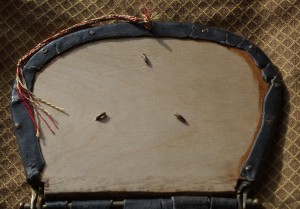
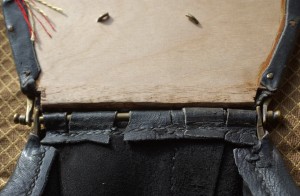
Next time: My first attempt at making a purse with a frame.

Follow-up on The Leather Purse with Metal Frame – pt 2

bottom frame

A shot showing the shape of the bottom of the purse frame and how the leather bag portion of the purse was sewn on. You can see the stitching around the frame and the line of stitching down the back of the purse.


The bottom of the leather purse bag, showing the bottom “inset” as well as the flat lap seam which lays against the wearer when the purse is in use.

bottom of purse

A close up of the toggle and exactly where it goes through the leather of the purse in leather togglerelation to the bottom half of the purse frame. This form of leather toggle is definitely period. I saw exactly the same type of toggle used on Viking Age Anglo Saxon ankle boots in the Museum of London. (And yes, I left nose prints on the glass figuring out exactly how they were made!)


A picture of the purse, laid out completely, from the back side. The leather bag is not cut perfectly symmetrically, but it looks good and hangs straight when it is on.

purse from the back

The next picture is a close-up of the support loops that go onto a belt, the metal support close loops and pivotloops that are soldered to the purse frame and the pivot mechanism. The leather loops have two rows of stitching to hold them closed and would normally have this seam rotated against the wearer’s body. On period frames the metal loops that attach to the purse frame would have been cast in one piece with the frame itself.


I hope these pictures help to make the previous Leather Purse with Metal Frame blog pages more useful! About a year after I made this purse I switched from using a belt pouch to carrying an over the shoulder bag, which allowed me to carry more craft projects with me. Due to my current position as an SCA Landed Baroness, I am once again considering switching back to a belt pouch. I need to have room for a smart phone, cards, a small notebook and a pen, and lip balm. So stay tuned to see what sort of new purse I decide on – something a little smaller I think with a cast frame! Enjoy!


Follow-up on The Leather Purse with Metal Frame – pt 1

The original documentation that I wrote for this leather purse with metal frame project was intended to be read while actually viewing the purse. So I decided that I needed to write another article which included pictures of the purse. Unfortunately I did not have a digital camera at the time that I made the purse, so there are no “in progress” shots, but I still have the purse and have used it for many years. I learned a LOT from making this purse, including what I will do differently next time!

Since I made this leather purse with metal frame, I have seen even more types of purse frames, including purse hangers. Museums and curators often describe both purse frames and purse hangers as “cast.” Some purse frames and purse hangers are definitely completely cast, but I think that parts of the plain purse frames are just hand formed. They did cast many of the pieces that I soldered together as one piece. Soldering was a difficult process in period, so casting in one piece and riveting things together were the preferred techniques. I used silver solder to put things together, but much “low end” period soldering was done with tin and lead solders.

The leather purse with metal frame that I made is too big for me. It has a natural tendency to collect ten pounds of “stuff”, something that I have never liked even in the “real world”. The actual size of the purse lid is   7 1/16 inches wide by 5 1/16 inches tall. The purse bag portion is almost 9 inches deep with a bottom insert of 9 ¾ by 3 3/8  inches.

When I made the purse lid, I was concerned about it opening and things falling out. So I added a hand made leather toggle and a handmade silk tie to wrap around the toggle. What I discovered is that I never use it! It is just in the way when I want to get into the purse in a hurry. The weight of the purse lid and purse frame tends to naturally hold the purse closed. I suppose if I did a lot of jumping jacks or running, the flopping around that leather purse with metal frameensued might allow things to fall out. Under normal walking conditions the purse lid stays closed. If I were to put LARGE things into the purse so that it barely closes, I would use the leather toggle and silk tie. I would also use it if I was concerned about pick pockets.

The first picture that I am including is of the purse in the position that it is in when it is on my belt. The picture shows what I mean about a natural tendency to stay closed. The pivot of the purse lid is against my body and supported by the leather loops, so the purse frame and purse lid tend to naturally hang down flat.


The next picture shows the purse lid. You can see the frame and rivets clearly. The Purse lidenameled piece is also riveted in place. The rivet that sticks up in the middle of the edge of the purse frame is bent over on the other end to form a loop, and the tie (handmade red and yellow silk cord) is tied to this loop.


The inside of the lid, showing the birch board, the long rivet that has been turned into a inside of lidloop, the silk cord, the peaned over rivets that hold the enameled medallion in place and the more neatly finished rivets around the edges that hold the frame to the lid.


An up close shot of the hinge area. The support bar is slightly bent from use (it is about 12 hinge areayears old), but it was originally straight. The distance from the end of the finial on the left end of the support bar to the end of the finial on the right end is 5 7/8 inches. You can see where the upper and lower portions of the purse frame fit on to the support bar and allow it all to become a big hinge.


Enhanced by Zemanta