Jewelry: Understanding Enamel

When I first thought about doing this article I considered all of the very detailed information that has been written about enameling, and then I thought sometimes people want to just have a basic understanding of a process, without too many details. So basic it is.

Enameling is a process of decorating the surface of metal with color. The earliest examples of enamel work appear to have been done in Egypt about 1600 BC, so the process has been around for a very long time.
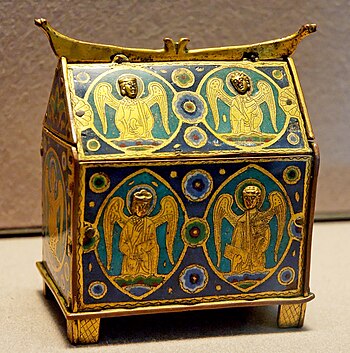
 

Box with angels, intended to contain small bot...

Box with angels, intended to contain small bottles of holy oils. Champlevé enamel over gilt copper, early 13th century, Limoges (Limousin, France). (Photo credit: Wikipedia)

Unfortunately, in modern times the word enamel has come to refer to a type of paint. But we are not talking about paint, we are talking about melted glass. We are also not talking about “cold enamel”, which is actually colored epoxy.

Enameling is usually done only on fairly high carat gold or fine silver objects, but it can be done on true bronze and copper. Why the limitations on the types of metal? Because the process of heating the metal to adhere the enamel causes the metal to share molecules with the enamel in the form of metal salts. Metal salts are what are used to actually color glass, so additional metals salts will change the color of the glass.

The basic enameling process goes like this. Glass is ground up and then rinsed in clean water to remove any cloudiness. The powdered glass is then placed in contact with an appropriate metal. It can be held in place by indentations in the metal, or wires. It can also have organic glue, which will burn off during the heating process, mixed with it to help hold the powdered glass in place.

The actual process of heating up the metal and glass is called “firing”, the same as with pottery. The metal and powered glass are heated until the glass fuses back together into a sheet on the surface of the metal. The glass is now enamel.

You may wonder what makes the glass stick to the metal. Molten glass generally likes sticking to metal, as any lamp worker who has ever had a bead get stuck on a tool or mandrel can tell you. This natural tendency can also be improved by carved out depressions in the metal for the enamel to melt into, and these depressions can be made even more efficient by creating an “undercut” on the sides of them. This undercut creates a physical lock on the sides of the enamel that helps to hold it in place.

The care and feeding of enamel. Enamel is, after all, glass. If you bend the metal on which it is placed it will very likely crack and it may even pop off. Smacking a piece of enamel on a hard, sharp object will almost certainly chip the enamel, the same way your windshield is chipped by a flying stone. The fact that we have thousands of pieces of jewelry, and decorative pieces that still have enamel on them, after hundreds, and sometimes thousands of years, is a testament to the fact that enamel is a wearable and functional form of decoration.

I hope that this brief article has given you some insight into the basic concept of glass enamel.


picture of enamel

picture of enamel (Photo credit: Wikipedia)


Enhanced by Zemanta

Basic Jewelry – Understanding Wire: Part 3

This is the third in my series of blogs about understanding wire. If you will remember, the three basic things that you need to understand about wire are:

1. What the wire is made of.

2. How hard the wire is.

3. What gauge the wire is.

Today we are discussing wire gauges. So what exactly is a wire gauge? It is simply a unit of measure that tells us how large the wire is. It is based on the diameter of a cross-section of the wire.

There is more than one gauge scale that is used to describe the size of wire. And which scale you use is determined by where you live and what type of wire you are dealing with. In the United States and Canada the common wire gauge system that is used for measuring the type of wire that jewelers usually use is the American Wire Gauge, most often known as Brown & Sharp (B&S). It was developed in about 1855 in England by Messrs. Brown & Sharpe. The British Standard System was adopted in England in 1986. It uses a measurement system that is based on the metric system.

What is important to the artist is knowing which system of gauges is being used and what size the wire is. Obviously, if you are buying the wire in person you can simply look at it and decide which size of wire to purchase, but if you are purchasing wire online, sending someone else to buy the wire for you, or trying to duplicate a piece of wire work exactly, knowing the correct wire gauge is important. I have included a copy of the actual measurements that are associated with the B&S system. If you are working with any other gauge system or with specialty wires (iron, steel, electrical) you will need to determine what the actual measurements for that system are.

wire gauges

The first thing that you should notice about this system is that the larger the gauge number, the smaller the wire. The second unusual thing is that only even numbers are used. I have seen companies use odd numbered gauge sizes, but this is usually only done with the larger sized wires.

If your brain is saying “this whole thing is meaningless to me, it is just a bunch of numbers” then I have a couple of suggestions. The easiest thing to do is to get a ruler with metric markings on it and estimate the size of the wire that you want that way. Another solution is to create a little sample chart on a piece of poster board with actual examples of the different sizes of wire that they use most often- labeled. Still anoither solution is to purchase a wire gauge.

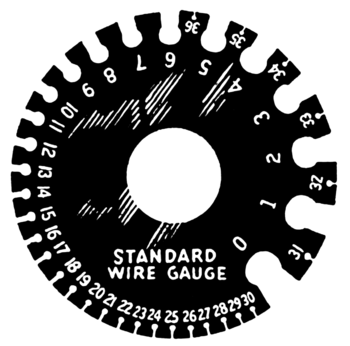
A wire gauge.

A wire gauge. (Photo credit: Wikipedia)

This is what a wire gauge looks like. It is a flat round piece of metal with little notches on the edge that show the actual size of the wires. It can be used to physically measure a piece of wire to determine what the gauge of the wire is, and it can also act as a visual reminder of the size of the different gauges of wire.

I hope that this brief article makes it easier for you to find the correct gauge of wire for your project!

Enhanced by Zemanta

Jewelry Basics : Understanding Wire: Part 2

So last time we started talking about what you need to understand about wire, and we started learning the basics.

The three basic things that you need to understand about wire are:

1. What the wire is made of.

2. How hard the wire is.

3. What gauge the wire is.

This week we are talking about understanding the hardness of the wire. Wire is usually sold hard, half hard or dead soft. But what exactly does that mean? Well, basically it means what it says. If the wire is hard, it is stiff and relatively inflexible. Dead soft means that the wire has been thoroughly annealed and is about as soft as the metal that it is made of will allow it to be. And half hard is half-way in between. Some manufacturers will use other terms using fractions, like ¼ hard, or ¾ hard, but these are less common, and rarely found in craft wire. If you feel a need to understand the more complex scientific definitions of wire hardness, in terms of tensile strength and hardness scales, Rio Grande Jewelry has a chart which shows all of the major hardness details.

http://www.riogrande.com/Content/Wire-Wrappers-CG-html?Pos=12

But why does the hardness of the wire matter? Well if the wire is too soft it will not hold its shape, but if it is too hard it may actually break while you are bending or twisting it. Most of the time half-hard wire is a good choice. It will allow you to bend it, but it will harden just enough from bending it that it will hold its shape well. Remember, the process of bending or hammering a wire actually hardens it.

If you are doing complex twisting of the wire, as with head pins and wire wrapping, then you probably will want to purchase your wire dead soft. There are few things more frustrating than having a wire break while you are trying to finish the final wrap on a piece.

This picture shows a piece of modern jewelry that was wire wrapped. The wire started out dead soft, but because of the extensive twisting and shaping, the final form of the wire is hard.

Etsy 18 close

Hard wire is usually used when you want a very stiff wire form, like a pin. Very few craft locations, or even jewelry suppliers sell hard wire, it must normally be purchased from a metal supply house in the form of straight sticks, or created by drawing the wire down and/or hammering it.

Another term that you may run across for some metals is spring hard. This indicates metal that has been hardened, usually by a combination of drawing and heat treating until it is actually springy and is VERY difficult to bend. This type of metal must definitely be purchased from a metal supplier in the form of straight sticks. It is usually used in equipment manufacturing.

I hope this simple explanation of wire hardness is helpful to you. Choosing the correct wire hardness for a project is important in assuring your success.

Next time: Understanding Wire Gauges