Camping: Making Your Bed and Sleeping Warm

Our weather at camping events this past year was a challenge; anywhere between 30 and 75 degrees at night. One of the events that I did, by myself, was extremely cold and windy every single night. Camping in a medieval canvas pavilion, with no one else to help provide body heat, can make staying comfortable at night something of a challenge. I had checked the weather forecast before I went, and I knew that the temperature was going to be a concern. My solution? Something that I call the camping burrito.

When you are sleeping on a cot you lose heat in all directions, up and down and sideways. I use a futon mat on my cot, which makes it considerably more comfortable (I have a bad back), and provides some insulation from the cold under the cot. When I know that it is going to be cold I start by placing my cot as far away from the canvas wall as I can. Then, on top of the futon I start layering the sleeping bags, quilts, blankets and sheets that I plan to use. I actually place the sheet on the TOP of the pile, because I am going to fold the entire mass of bedding over the top, like a giant burrito.

Burito Bed
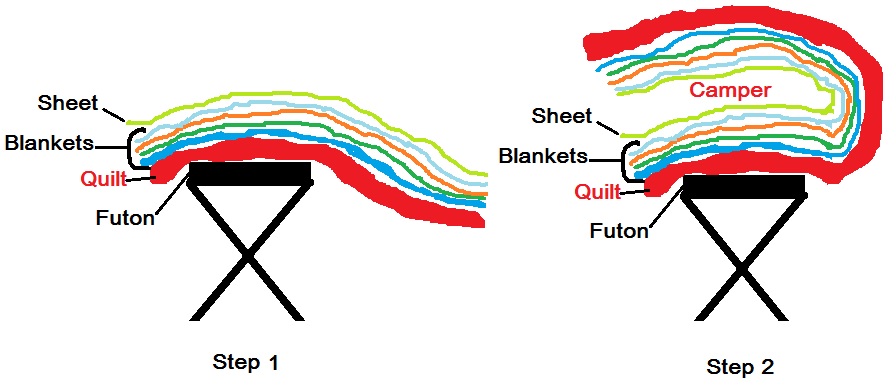
This diagram shows exactly what I am talking about. All of my quilts, blankets and sheets are queen sized. The closed side of the covers is towards the canvas wall. This dramatically reduces the amount of air infiltration – no drafts. The fact that the covers are all queen sized means that there is plenty of extra covers on the open sides of the bed – again, no drafts. You can always pull the covers up over your head to complete the “package”.

And what should the camper be wearing? Well my favorite “extreme cold” outfit is wool socks, long johns with heavy flannel PJs over the top, a stocking cap, and a hooded sweatshirt. Everything about this “fashionable” outfit has a purpose. Warm, dry feet are a must – hence the socks. The layers on the body are pretty obvious, dry warmth. The hat helps to cut heat loss from the head and the hooded sweatshirt provides more warmth to the torso, covers the head with an additional layer and eliminates any drafts around the back of the neck (particularly important for those who do not like to sleep with their heads under the covers). In addition, we have discovered that many cell phones do not do well in cold weather – the cold literally kills their batteries, so in seriously chilly weather I put my cell phone in my sweat shirt pocket to keep the battery from going dead. I’m, not going to win a beauty contest, but I am going to get a good night’s sleep.

One of the things that I really like about this “burrito system” is that if the weather warms up you can easily pull back the top layer(s) or open up the side of the burrito for ventilation.

I hope that this “burrito system” will make your camping experience much more comfortable. I know that it has done a great job for me.

Eating Well When You Camp – Canning a Cake

I am sure that some of you are probably sitting there blinking right now, but canning a cake is one of the coolest, handiest and easiest things ever. I discovered it several years ago while reading one of those country living sort of magazines. We use the technique on a regular basis in order to have a shelf-stable, but yummy, dessert on no notice. Canning a cake allows us to have just a couple of portions for each person and then be done with it. No overeating and no stale cake. But it is also a great way to take a cake to a camping event. No smushed cakes, and just in case you don’t actually eat it all (unlikely) nothing wasted.

So how does one accomplish this not so modern miracle? Canning supplies and a good recipe. My very favorite is an old-fashioned pound cake. I have had mixed results with things like banana bread, but once you have had success with a basic pound cake you should experiment to find other options that you like. Be sure to read the instructions ALL THE WAY THROUGH before you make this so that you can have all of the equipment that you will need ready to go.

Canned Pound Cake Recipe

3 cups of sifted flour

1 tsp salt

1/2 cup shortening

1 cup butter

3 cups sugar

1 tsp vanilla extract

6 large eggs

1 cup of milk

7- 1 pint Freezer/Canning Jars

A note about using the correct canning jars: Freezer Jars are wide mouth jars that are smaller at the bottom than at the top. Do NOT use regular canning jars that have an opening smaller than the largest part of the jar – the cake will NOT come out in one piece. This picture shows the shape jar that you want to use.

front of new pint & half jar

front of new pint & half jar (Photo credit: Marisa | Food in Jars)

Clean and grease your jars (I use shortening on a paper towel). Preheat the oven to 350°F. Sift the flour and the salt together and set aside. Cream the shortening, sugar and butter together. Add the eggs to the shortening mixture – one at a time, beating in between. Add the vanilla and the milk to the shortening mixture, beating to incorporate. Slowly add in the flour mixture, while beating. Scrape the bowl thoroughly and then mix for an additional 2 to 3 minutes. Fill the jars 1/2 full. Be careful to clean the top rims of the jars. Place the jars on a baking sheet in the oven and bake for 45 minutes. Test with a toothpick to make sure they are done.

While the cake is cooking, clean and heat the jar lids in hot water and have your rings ready to use. Place a large cookie cooling rack, or a cutting board covered with a towel on the counter next to the oven and have a couple of good quality oven mitts or pot holders ready. You will need to be able to handle the hot jars and lids quickly and safely when the cakes are done. You can also use a canning jar lifter to remove the jars from the oven. Remember the jars are 350°F.

When the cakes are done, turn off the oven. Keep the oven closed. Quickly dry a hot jar lid with a piece of clean paper towel. Take the jars out ONE AT A TIME. Check the top of the jar to make sure that it is clean, place the lid on the jar, screw on the band, turn the jar upside down and allow it to cool on the rack or towel. Repeat until all of your jars are sealed. Once the jars are completely cooled, check the seal of each jar. If the jar has not sealed use the cake within a week. If the jar is sealed properly, label and store the jar in a cool dark location. I am not really sure how long they will last, because we have always eaten them within 3 months, but they should last at least 6 months.

To serve, open the jar, dump out the cake, and slice it. Our favorite dessert when camping is this cake with canned peaches in a bowl. Yum! Use your imagination, and remember – when canning cleanliness is above godliness – clean hands, clean counter, clean equipment and clean fresh paper towels are your friends. Enjoy!

Enhanced by Zemanta

Eating Well When You Camp: Part 5: But What do We do for a REALLY Long War like Pennsic?

The Pennsic War is unique in the SCA. To my knowledge it is the only two week long war that is scheduled every year. While there are plenty of food merchants at this event, if you want to eat your own food for the entire time, it is definitely possible, it just takes a bit more planning.

So how do you camp for more extended periods of time? Well, we use a combination of the tactics that we have already discussed and a few other handy tricks. The first trick, which we sometimes use even for week long events, is to freeze gallon jugs of drinking water in the deep freeze. You must purchase drinking water in plastic bottles with screw tops. The pop-off tops will fall off from the pressure of the ice when the water freezes.

We use two or three of these frozen gallon containers in the bottom of a five day cooler. This cooler is dedicated completely to zero degree frozen food. The food is packed into the cooler, the top is shut tightly and a blanket or quilt is used to increase the insulation factor. We are extra careful to keep this cooler away from the wall of the tent, especially if that wall gets sun. The more stable that you can keep the temperature, the better. This arrangement will usually keep the food in the cooler completely frozen for four to six days, especially if you have frozen the food in blocks. When the gallons of water are finally melted they become an excellent source of safe cold water for drinking.

So, you can rely on fresh food for two to four days, then frozen meals for 2 to four days, and then? Well, there are some “fresh” foods which are just plain less susceptible to spoilage than others, for instance, carrots and ham. A ham steak, with canned yams and biscuits makes a lovely dinner. As long as you keep the ham on ice it will keep for weeks. I usually carry water proof boxes of flour, and brown sugar with me. Canned yams + brown sugar + butter + frying pan = candied yams. Yum! Carrots will keep for weeks if you keep them from drying out. Boil them and serve with a little butter, or candy them. Delicious and nutritious either way. Oh, and you can even buy canned ham – that is good for years. Which brings me to another topic – canning.

Canned food

Canned food (Photo credit: excelglen)

Obviously you can always resort to commercially canned food (commercially prepared dehydrated food, too). Almost anything that you can think of comes in a can – soup, stew, hot dogs and beans, meat, fish… But, yes, we can our own food to take camping – beef roast in broth is just as good canned as fresh. We have even experimented with canned soup concentrates, sauerkraut, pickled vegetables, cookies and cake, all of which were yummy.

Our goal when we camp is to have safe, delicious food that takes a minimum amount of preparation. As merchants our schedule is often dictated by the presence of customers, but good food is still important to our health and general well-being.

Next Time: Eating Well When You Camp – Canning a Cake

Enhanced by Zemanta