I am sure that some of you are probably sitting there blinking right now, but canning a cake is one of the coolest, handiest and easiest things ever. I discovered it several years ago while reading one of those country living sort of magazines. We use the technique on a regular basis in order to have a shelf-stable, but yummy, dessert on no notice. Canning a cake allows us to have just a couple of portions for each person and then be done with it. No overeating and no stale cake. But it is also a great way to take a cake to a camping event. No smushed cakes, and just in case you don’t actually eat it all (unlikely) nothing wasted.
So how does one accomplish this not so modern miracle? Canning supplies and a good recipe. My very favorite is an old-fashioned pound cake. I have had mixed results with things like banana bread, but once you have had success with a basic pound cake you should experiment to find other options that you like. Be sure to read the instructions ALL THE WAY THROUGH before you make this so that you can have all of the equipment that you will need ready to go.
Canned Pound Cake Recipe
3 cups of sifted flour
1 tsp salt
1/2 cup shortening
1 cup butter
3 cups sugar
1 tsp vanilla extract
6 large eggs
1 cup of milk
7- 1 pint Freezer/Canning Jars
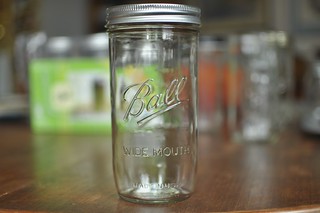
A note about using the correct canning jars: Freezer Jars are wide mouth jars that are smaller at the bottom than at the top. Do NOT use regular canning jars that have an opening smaller than the largest part of the jar – the cake will NOT come out in one piece. This picture shows the shape jar that you want to use.
Clean and grease your jars (I use shortening on a paper towel). Preheat the oven to 350°F. Sift the flour and the salt together and set aside. Cream the shortening, sugar and butter together. Add the eggs to the shortening mixture – one at a time, beating in between. Add the vanilla and the milk to the shortening mixture, beating to incorporate. Slowly add in the flour mixture, while beating. Scrape the bowl thoroughly and then mix for an additional 2 to 3 minutes. Fill the jars 1/2 full. Be careful to clean the top rims of the jars. Place the jars on a baking sheet in the oven and bake for 45 minutes. Test with a toothpick to make sure they are done.
While the cake is cooking, clean and heat the jar lids in hot water and have your rings ready to use. Place a large cookie cooling rack, or a cutting board covered with a towel on the counter next to the oven and have a couple of good quality oven mitts or pot holders ready. You will need to be able to handle the hot jars and lids quickly and safely when the cakes are done. You can also use a canning jar lifter to remove the jars from the oven. Remember the jars are 350°F.
When the cakes are done, turn off the oven. Keep the oven closed. Quickly dry a hot jar lid with a piece of clean paper towel. Take the jars out ONE AT A TIME. Check the top of the jar to make sure that it is clean, place the lid on the jar, screw on the band, turn the jar upside down and allow it to cool on the rack or towel. Repeat until all of your jars are sealed. Once the jars are completely cooled, check the seal of each jar. If the jar has not sealed use the cake within a week. If the jar is sealed properly, label and store the jar in a cool dark location. I am not really sure how long they will last, because we have always eaten them within 3 months, but they should last at least 6 months.
To serve, open the jar, dump out the cake, and slice it. Our favorite dessert when camping is this cake with canned peaches in a bowl. Yum! Use your imagination, and remember – when canning cleanliness is above godliness – clean hands, clean counter, clean equipment and clean fresh paper towels are your friends. Enjoy!


You may contact Eirny by clicking on the “e-mail me” button at the main menu.
I’m not sure if this got a reply back to you. The there is a customized version of the 2012 theme from WordPress.
Pingback: sac a main chanel occasion
Pingback: air max 95