Dealing with Sterling Silver Jewelry Shapes that are Difficult To Polish

Dealing with sterling silver jewelry shapes that are difficult to polish can be challenging.

Yesterday I was working on a large sterling silver jewelry project – a coronet for a friend who is a historic re-enactor. There are a LOT of differences between working on small pieces of jewelry, and working with something this large. And that reality prompted me to make a couple of quick tools to make the polishing safer and more effective.  As I was working, I realized that a couple of the things that I had figured out might be of use to others, so here are two quick tips for polishing large objects.

The sterling silver jewelry piece that I was working on was challenging because it was large with lots of pointy bits that made it waay too dangerous to polish on a big polishing wheel. The opportunity for it to catch in the wheel and either do damage to me or the piece was a serious concern. So that meant it was time to haul out the flex shaft for finishing! But how to hold and polish the piece at the same time? The piece is essentially a large oval, made from a strip of sterling silver one inch wide and 25 inches long. The band is decorated with sterling silver annulets (think donut shapes) and a specialized form of a sterling silver cross with a pointy bottom and exaggerated pointy arms. The annulets are completely soldered flat to the band, but the crosses stick up above the top of the band with all of their pointy goodness just waiting to hook onto any polishing wheel that comes near them. I often polish smaller pieces by simply holding them in my hand, but that was NOT going to work for this large piece of sterling silver jewelry (well it’s more of an accessory than what we think of as jewelry). I am fortunate enough to have a jewelers’ bench in my Studio, so I put padded bench pin
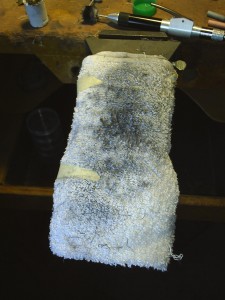
the bench pin into the front of the bench. Now for those of you who don’t have something like a bench pin, well, I would probably lay a chair down on the floor on its side, sit on the floor or a stool, and use one of the legs as a support. The chair leg can serve the same function as a bench pin in this application.

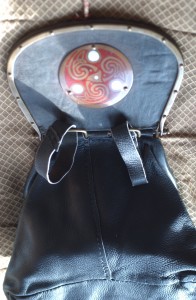
I always have a pile of those white terry cloth shop towels in my Studio. They are inexpensive, and handy for everything from spills to padding, which is exactly what I used one for! I folded the towel in half, wrapped it around the bench pin   and then held it in place with some masking tape. Now I had a clean, slightly rounded and padded, non-scratch support (a temporarily modified bench pin) that I could rest my massive sterling silver jewelry on for polishing. If I were using a chair leg, the towel would protect the chair and give the same kind of padding ( I would NOT do this with grandma’s valuable antique chair, just in case). The piece, remember it is a large oval, could literally hang on the towel-covered bench pin (or chair leg) and easily be held in place with one hand while I polished it with the other. There is another seriously important aspect to this arrangement. When it coronet on padded bench pinwas time to polish the tops of the sterling silver crosses, even the flexshaft wanted to hook onto and dance around the piece. Solution? Press the top of the crosses down into the towel just slightly. The polishing buff could easily do its job on the front of the crosses without catching the edge of the piece. It does get the towel dirty, but that is what those towels are for – they are called shop towels for a reason!

My goal when I whipped up this quick little modified bench pin support was three-fold – protect me, protect the piece, and allow me to polish the piece until the sterling silver gleamed. Mission accomplished! I hope this gives you some ideas for making your own workshop safer and more productive! I’ve included a picture so you can see my “high-tech” support system and what the sterling silver piece looked like while it was being polished. Enjoy!

Enhanced by Zemanta

Follow-up on The Leather Purse with Metal Frame – pt 2

bottom frame

A shot showing the shape of the bottom of the purse frame and how the leather bag portion of the purse was sewn on. You can see the stitching around the frame and the line of stitching down the back of the purse.


The bottom of the leather purse bag, showing the bottom “inset” as well as the flat lap seam which lays against the wearer when the purse is in use.

bottom of purse

A close up of the toggle and exactly where it goes through the leather of the purse in leather togglerelation to the bottom half of the purse frame. This form of leather toggle is definitely period. I saw exactly the same type of toggle used on Viking Age Anglo Saxon ankle boots in the Museum of London. (And yes, I left nose prints on the glass figuring out exactly how they were made!)


A picture of the purse, laid out completely, from the back side. The leather bag is not cut perfectly symmetrically, but it looks good and hangs straight when it is on.

purse from the back

The next picture is a close-up of the support loops that go onto a belt, the metal support close loops and pivotloops that are soldered to the purse frame and the pivot mechanism. The leather loops have two rows of stitching to hold them closed and would normally have this seam rotated against the wearer’s body. On period frames the metal loops that attach to the purse frame would have been cast in one piece with the frame itself.


I hope these pictures help to make the previous Leather Purse with Metal Frame blog pages more useful! About a year after I made this purse I switched from using a belt pouch to carrying an over the shoulder bag, which allowed me to carry more craft projects with me. Due to my current position as an SCA Landed Baroness, I am once again considering switching back to a belt pouch. I need to have room for a smart phone, cards, a small notebook and a pen, and lip balm. So stay tuned to see what sort of new purse I decide on – something a little smaller I think with a cast frame! Enjoy!


Follow-up on The Leather Purse with Metal Frame – pt 1

The original documentation that I wrote for this leather purse with metal frame project was intended to be read while actually viewing the purse. So I decided that I needed to write another article which included pictures of the purse. Unfortunately I did not have a digital camera at the time that I made the purse, so there are no “in progress” shots, but I still have the purse and have used it for many years. I learned a LOT from making this purse, including what I will do differently next time!

Since I made this leather purse with metal frame, I have seen even more types of purse frames, including purse hangers. Museums and curators often describe both purse frames and purse hangers as “cast.” Some purse frames and purse hangers are definitely completely cast, but I think that parts of the plain purse frames are just hand formed. They did cast many of the pieces that I soldered together as one piece. Soldering was a difficult process in period, so casting in one piece and riveting things together were the preferred techniques. I used silver solder to put things together, but much “low end” period soldering was done with tin and lead solders.

The leather purse with metal frame that I made is too big for me. It has a natural tendency to collect ten pounds of “stuff”, something that I have never liked even in the “real world”. The actual size of the purse lid is   7 1/16 inches wide by 5 1/16 inches tall. The purse bag portion is almost 9 inches deep with a bottom insert of 9 ¾ by 3 3/8  inches.

When I made the purse lid, I was concerned about it opening and things falling out. So I added a hand made leather toggle and a handmade silk tie to wrap around the toggle. What I discovered is that I never use it! It is just in the way when I want to get into the purse in a hurry. The weight of the purse lid and purse frame tends to naturally hold the purse closed. I suppose if I did a lot of jumping jacks or running, the flopping around that leather purse with metal frameensued might allow things to fall out. Under normal walking conditions the purse lid stays closed. If I were to put LARGE things into the purse so that it barely closes, I would use the leather toggle and silk tie. I would also use it if I was concerned about pick pockets.

The first picture that I am including is of the purse in the position that it is in when it is on my belt. The picture shows what I mean about a natural tendency to stay closed. The pivot of the purse lid is against my body and supported by the leather loops, so the purse frame and purse lid tend to naturally hang down flat.


The next picture shows the purse lid. You can see the frame and rivets clearly. The Purse lidenameled piece is also riveted in place. The rivet that sticks up in the middle of the edge of the purse frame is bent over on the other end to form a loop, and the tie (handmade red and yellow silk cord) is tied to this loop.


The inside of the lid, showing the birch board, the long rivet that has been turned into a inside of lidloop, the silk cord, the peaned over rivets that hold the enameled medallion in place and the more neatly finished rivets around the edges that hold the frame to the lid.


An up close shot of the hinge area. The support bar is slightly bent from use (it is about 12 hinge areayears old), but it was originally straight. The distance from the end of the finial on the left end of the support bar to the end of the finial on the right end is 5 7/8 inches. You can see where the upper and lower portions of the purse frame fit on to the support bar and allow it all to become a big hinge.


Enhanced by Zemanta