Stamping on Metal

Chatting with friends and customers has made me acutely aware of why it is important for people to understand the basics of metal working. Having insight into how a metal object is made allows you to better understand a piece, whether you are doing research, ordering a custom piece, or buying an off-the-rack item. There are a number of methods used to shape metal for utilitarian purposes, decoration, and personal adornment. Using a hammer on metal is one of the oldest techniques used to shape metal – so the first blog will be on stamping metal.

What do we need to stamp metal? A hammer, a surface to hammer on, a stamp, and the metal that will be shaped.

Let’s start with the stamp. Stamps are usually made by softening a piece of steel, shaping the stamp, and then re-hardening the steel.

How does all of this softening and hardening take place? Heat!

The process of making the steel, or any other metal, softer is called annealing. The metal is heated to an appropriate temperature, which varies from metal to metal, and  then allowed to cool slowly. This process removes the stress that is left over from manufacturing and softens the metal.

Why does removing the stress from manufacturing the metal matter? The stress in the metal affects the way the metal behaves when you work it by hammering, compressing, or bending. Stressed metal can crack or chip when you work with it.

So the steel for the stamp has been annealed. Now it can be shaped to make the design that you want, using drills, saws, and files. Once the shape of the stamp is correct, the steel is reheated. This time it is quenched, usually in oil. This process is called tempering. It hardens the steel in a specific way, which makes it hard, but not too brittle. Most people purchase their stamps. It’s also important to know that some metals like brass can not be hardened by heat treatment – they’re generally not good to use as a metal stamp.

Let’s talk about hammers. DO NOT use a hammer with a hard steel face, like a framing hammer. Why not? Well, two reasons. The first is that the face of the hammer can actually chip and throw pieces of metal, which can be dangerous. The second reason is that a hardened hammer head will place more stress on the stamp and tend to cause the top of the stamp to spread, also called “mushrooming”. You might have seen a tent stake with a “mushroomed” head caused by hammering it. Relax, this will eventually happen to stamps used to decorate metal to some extent, but there is no need to speed up the process.

What sort of hammer should we use? Your best options are a Brass or Copper headed hammer or mallet. The Brass or Copper heads are much softer than the steel of the stamp and will not damage the stamp. The advantage of using a mallet is that the weight of the mallet will do a lot of the work for you and put less stress on your arm.

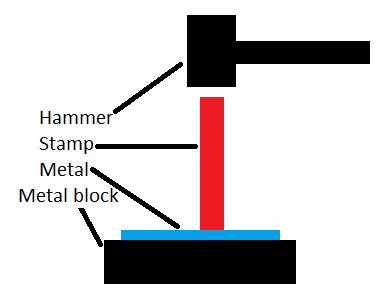
What sort of surface do we use to do the stamping on? Well, the best surface is some sort of smooth metal, usually a metal block or an anvil. You want to have the full force of the hammer transfer to the stamp and then into the metal sheet. Having the metal that you are stamping backed up by a smooth block of metal means that the force from the hammer is focused into the metal sheet and creates a crisp image. Equally important,   the metal is not marred by an uneven surface. The graphic shows the basic arrangement of tools for stamping.

Stamping ProcessThis picture shows some of my favorite tools for doing stamping.

Stamping Kit

I hope that this information makes both your purchases and your research more interesting and productive.

Next time: Chasing and Repousse!

Camp Beds: Part 3 –Getting off of the Ground – Homemade & Crafted Solutions: Part 3 – Bolted Together Bed

When we started camping in period pavilions we asked our friends what sort of beds they were sleeping on. And this is the bed that we settled on. It is not period, but it is comfortable, sturdy and easy to break down and set up quickly.

M3361S-3034

When it is “dressed” it can look as plain or fancy as you want it to. It would also be simple to extend the top of the legs up to create a four poster bed. We always cover our pillows completely during the day to keep them clean.

M3361S-3034

So how do we start?

First decide how large a bed you are going to make. Measure the mattress and make the bed at least 1 inch larger in both directions. This gives you room for your covers to be tucked in around the mattress.

Here is a picture of the leg construction, from the bottom. The leg is made of two pieces of wood with a third piece acting as a stabilizer. All three pieces are glued and screwed together. A and B are the same height and C only goes up to the level of the side rails. The rails will actually rest on C when they are bolted in place. You need to decide how tall you want the legs to be. Ours are tall enough to allow us slide our storage tubs under the bed.

M3361S-3034This is the way the headboard and foot board of the bed are assembled.

M3361S-3034

Four bolts, with washers and wing nuts hold the legs to the headboard.

The side rails of the bed are also made of several pieces of wood. C is the actual side rail, B is the shelf that the bed boards rest on, and A is a stabilizer for the bed board shelf and also stiffens the bed rail. When the side rail is in use board C is vertical.

M3361S-3034

This next picture shows the side rail in place. You will notice that each one of the pieces is marked with the letter D. That makes it easy to find all of the pieces and assemble them quickly. No matter how careful you are about drilling your holes, each corner of the bed will be slightly different. Any system that allows you to keep the correct pieces together will work.

M3361S-3034

The distance from the bottom of boards 2 and 3 to the ground determines the height of the items that you can easily slide under the bed.

The next picture shows the bed frame with a single bed board in place. The mattress will rest on top of the boards when they are all in place. If you are using an air mattress I recommend that you put an old blanket or canvas tarp on top of the bed boards before you put the mattress in place. You will need to protect the air mattress from splinters and the bolts in the corner of the bed frame. If you are camping in cold weather placing a survival blanket under the mattress will help keep you warmer.

M3361S-3034

Once you have put all of the boards into the frame you can put the mattress in place. The mattress actually sits down into the frame, so that it does not slide off.

M3361S-3034

Now that you have seen the basic process, you or some other handy person can easily make one of these beds. There is another very important hint that you may be able to spot in the picture above.

M3361S-3034

The bed, if properly constructed, will be square and will work perfectly on level ground. But when was the last time that you camped on perfectly level ground? Save the cut off pieces of boards from your projects and always carry some with you. Whether you are on a slight hill, or you have a hole under a single leg, the boards will make your bed a much more comfortable place.

I hope this blog series has given you some good ideas about what you would like to do with your own camping bed arrangements.


Camp Beds – Part 3: – Getting off of the Ground – Homemade and Crafted Solutions: Part 2 – Springs and Assembly

One of the major goals when creating your camp bed is comfort. Your bed at home generally has a box spring, but what can you use in a home-made camp bed? The most common camp bed solutions are rope springs and boards. Both are historically accurate and functional. The boards are heavier, but the ropes need to be re-tensioned every few days, take longer to assemble and are more likely to break.  This graphic shows how both of these techniques work. The rope can actually be used as part of the structure of the bed – keeping the boards under tension, but this also means that a broken rope can mean a broken bed. If you maintain your ropes, watching for worn spots and making sure that the ropes are sturdy (no clothes line!) this should NOT be a problem. The boards are simply laid on supports on the side rails of the bed. Be sure that the boards fit fairly snugly between the side rails so that when they bend they do not slide off of the side rail supports.

Bed springs

So how do we put the wooden pieces of the bed together?

I have seen some amazingly complex and beautiful wooden beds – pegs, mortise and tenons, all sorts of creative and historically inspired furniture designs. I have to admit that when we made our bed it was put together with ¼ inch nuts and bolts. Why bolts? Simplicity, strength, and ease of construction. But more on that later… I should explain some of your options before I tell you how we do our beds.

Mortise and Tenon Joint

So what is a mortise and tenon? The blue represents the upright that has a hole, called a mortise, cut through it. The white piece that sticks through the mortise is called a tenon and the red piece is a peg which keeps the two pieces anchored firmly together.

If properly constructed this is a very sturdy joint and was a major technique for joining wood together for centuries. It has the advantage of being able to be taken apart easily for transportation.

This next version of the graphic shows the details of the upright and the beam as they would appear in a bed. If you think about the fact that you are cutting a hole through a vertical piece of wood and putting another piece of wood through the hole, you should be able to see some of the issues. The quality of both pieces of wood must be good. The most critical piece is actually the tenon since that beam is greatly reduced in size in order to fit through the mortise AND a hole is cut through the beam to accept the peg. If the quality of this piece of wood is not good, it will break. The upright, while important, can easily be made heavier – and that piece of wood is in compression – which makes it much less likely to break.

Mortise and tenon 2


Lots to think about and figure out! Next time we will discuss the bed design that we have used for the past 15 years.