Metal Techniques Part 2: Chasing and Repousse

Lately I have run across several instances of people having no idea how a technical word should be pronounced. First let’s learn how to say these words correctly. Chasing is said just the way it looks – the dog is chasing the cat. But the second is a french word: repousse is pronounced ray – poo – say.

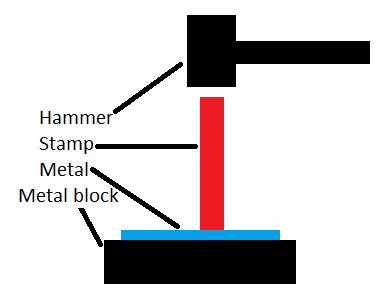
The process of chasing and repousse almost looks like stamping, until you look closely. When we use stamps on metal, the metal sheet is placed on another hard metal surface and the stamp literally crushes itself down into the surface of the metal sheet. The metal sheet remains mostly flat with only a tiny ridge of metal around the stamped design.

Chasing and Repousse uses tiny stamps, usually in simple shapes, to form the metal.The metal sheet is backed with a flexible substance, and the metal becomes three dimensional.

Here is an example of the sort of simple tools that are used to do chasing and repousse.

Chasing Tools

So what EXACTLY do these words mean? Repousse is hammering the metal sheet from the back to raise the surface of the metal and chasing is lightly stamping the raised design from the front to add more detail and refine the raised shape.

These techniques were developed a couple of thousand years ago and were most famously used on gold sheet by groups that included the Scythians, Greeks, Romans, Celts and Franks.

Here is an example of what chasing and repousse can look like.This is a 16th century gilt copper piece from Tibet.

Gilt copper repoussé from Tibet, 16th Century.

How can you hammer on a piece of metal from the back and allow the metal to stretch and become three dimensional? Pitch! Pitch is a flexible substance, which becomes semi-liquid when heated. It is melted and placed into a special heavy metal bowl. The metal is placed into the surface and allowed to stick there. If you place the metal face down in the pitch you can then shape and hammer it from the back to create your design. The pitch bowl is heavy and very stable – so you have both hands free to hold your tools. When the design is completed, the pitch is reheated and the metal is removed and cleaned. The metal can then be flipped over and re-anchored in the pitch for the chasing portion of the work.

Here are two pictures which show the before and after of a chasing project. The black substance in the background is pitch. The artist has taken a simple silver spoon, set it into pitch, drawn the design on the spoon and then used the chasing tools to form the metal.

 Skull-Spoon Chased 1Skull-Spoon Chased 2

There is no repousse involved in this project because the artist is using the already domed bowl of the spoon for that part of the project.

Here is another example of chasing without the repousse. The artisan is simply hammering the metal down into pitch the create a low relief design.

Chasing Workshop in the Grand Bazaar - 2

It is also possible to do simple chasing and repousse on a sand bag, which is exactly what it sounds like – a leather bag loosely filled with fine sand. This system is less stable and is generally not used for extremely detailed small pieces because of the difficulty of holding the pieces while working on them.

I hope this brief account of the technique of chasing and repousse gives you a better understanding of the complexity of the process and the amount of work involved. It may sound simple, but it really is quite time consuming and requires a LOT of attention to detail.

Next Time: Engraving


Stamping on Metal

Chatting with friends and customers has made me acutely aware of why it is important for people to understand the basics of metal working. Having insight into how a metal object is made allows you to better understand a piece, whether you are doing research, ordering a custom piece, or buying an off-the-rack item. There are a number of methods used to shape metal for utilitarian purposes, decoration, and personal adornment. Using a hammer on metal is one of the oldest techniques used to shape metal – so the first blog will be on stamping metal.

What do we need to stamp metal? A hammer, a surface to hammer on, a stamp, and the metal that will be shaped.

Let’s start with the stamp. Stamps are usually made by softening a piece of steel, shaping the stamp, and then re-hardening the steel.

How does all of this softening and hardening take place? Heat!

The process of making the steel, or any other metal, softer is called annealing. The metal is heated to an appropriate temperature, which varies from metal to metal, and  then allowed to cool slowly. This process removes the stress that is left over from manufacturing and softens the metal.

Why does removing the stress from manufacturing the metal matter? The stress in the metal affects the way the metal behaves when you work it by hammering, compressing, or bending. Stressed metal can crack or chip when you work with it.

So the steel for the stamp has been annealed. Now it can be shaped to make the design that you want, using drills, saws, and files. Once the shape of the stamp is correct, the steel is reheated. This time it is quenched, usually in oil. This process is called tempering. It hardens the steel in a specific way, which makes it hard, but not too brittle. Most people purchase their stamps. It’s also important to know that some metals like brass can not be hardened by heat treatment – they’re generally not good to use as a metal stamp.

Let’s talk about hammers. DO NOT use a hammer with a hard steel face, like a framing hammer. Why not? Well, two reasons. The first is that the face of the hammer can actually chip and throw pieces of metal, which can be dangerous. The second reason is that a hardened hammer head will place more stress on the stamp and tend to cause the top of the stamp to spread, also called “mushrooming”. You might have seen a tent stake with a “mushroomed” head caused by hammering it. Relax, this will eventually happen to stamps used to decorate metal to some extent, but there is no need to speed up the process.

What sort of hammer should we use? Your best options are a Brass or Copper headed hammer or mallet. The Brass or Copper heads are much softer than the steel of the stamp and will not damage the stamp. The advantage of using a mallet is that the weight of the mallet will do a lot of the work for you and put less stress on your arm.

What sort of surface do we use to do the stamping on? Well, the best surface is some sort of smooth metal, usually a metal block or an anvil. You want to have the full force of the hammer transfer to the stamp and then into the metal sheet. Having the metal that you are stamping backed up by a smooth block of metal means that the force from the hammer is focused into the metal sheet and creates a crisp image. Equally important,   the metal is not marred by an uneven surface. The graphic shows the basic arrangement of tools for stamping.

Stamping ProcessThis picture shows some of my favorite tools for doing stamping.

Stamping Kit

I hope that this information makes both your purchases and your research more interesting and productive.

Next time: Chasing and Repousse!

Staying in Touch With Your Phone

Cell phones help us maintain contact with friends and family throughout most of the continental US and much of Europe. But some of the areas that hold large-scale camping events have marginal cellular service.

A5406CA (cellular phone) open

A5406CA (cellular phone) open (Photo credit: Wikipedia)

These miniature marvels have limitations on the distance over which reliable communications can happen. Some sites have spotty service. Others have weak or marginal service. Still others are only served by one of the major cellular providers.

Cell phones provide essentially “line of sight” communications between your cell phone device and the cell phone tower. Many things can impact your ability to make or receive a call. The most obvious way to impact your cell service is to control the distance to the cell tower. If you are closer to a cell tower, reception will be improved. Being further away from a cell tower decreases reception. Generally speaking, cell phone reception will work within 12 miles of a tower site, providing the tower is “line of sight.” You may also be able to make calls from as far away as 22 miles from a cell tower.

Line of sight doesn’t strictly mean that you have a clear view of the cell tower. But some obstructions are deceptively opaque to the radio signals. Leaves of trees and bushes fall into this category. More obstructions mean less signal. Less signal means its harder to

English: The Faraday Cage is in the High volta...

English: The Faraday Cage is in the High voltage Lab of the University of canterbury Engineerig School. In the photo it was running at 110 000 volts, and the spark can be seen on the left where the technician is pointing a probe at the cage. (Photo credit: Wikipedia)

make and receive calls. Metal is the ultimate obstruction – if it is connected to the ground. Scientists use this fact to make Faraday cages to keep radio waves (that also make up cell phone signals) out of an area.

Signals can also be received even though a ridge is between you and the cell tower. And, sometimes you can see the cell tower very close to you, but you can’t get a signal. Both of these facts depend on how the cell tower signals are aimed by the antennas on the tower. What would be nice is a way to amplify the cell signals so that you can make a call when you are in a marginal area.

Your ability to connect to the cell service can be improved in many circumstances by using a cellular phone booster.

Wilson Electronics dB Pro Installation

Wilson Electronics dB Pro Installation (Photo credit: nan palmero)


Cell phone boosters can use simple whip antennas (like a car radio antenna) or a jogh gain antenna like that shown to the left.

Lower cost cell phone repeaters can be purchased for $200-$300. These boosters come with a simple whip antenna – AND your phone must be placed on a special pad to boost the signal. These boosters are powered from your car’s 12V system and work well. But, be aware that you can drain your car battery if you leave the booster on continuously for a long while.

More capable boosters are also available but they involve more and larger equipment. The equipment includes an external antenna – most often a directional antenna as shown below.

Wilson Electronics dB Pro Installation

Wilson Electronics dB Pro Installation (Photo credit: nan palmero)

Establishing cell phone service using signal boosting equipment is fairly easy but it does take some technical skill. Simple boosters with one antenna and a contact antenna for the cell phone are the easiest to install. Follow the simple directions. Establishing a link to distant cell towers is more complex and requires some knowledge of transmission systems – and takes some trial and error. All of these boosters include protection to prevent accidentally damaging the cell tower.  If you lack adequate skill to set up the more complex boosters, a local distributor may be able to provide you with training.

Enhanced by Zemanta