Casting Metal: Soapstone Molds Part 1

One of the things that I specialize in, in my shop, is cast metal. I cast pewter, bronze, white bronze, and sterling silver into an assortment of pieces of jewelry and dress accessories. Customers often ask me questions about casting, so I am going to write a set of blogs to help folks understand the basics of casting.

A common, and relatively simple form of casting, that was done before and during the Middle Ages, was soapstone casting. This is a relatively straight forward process where the artist carves soapstone to create cavities that molten metal can be poured into.

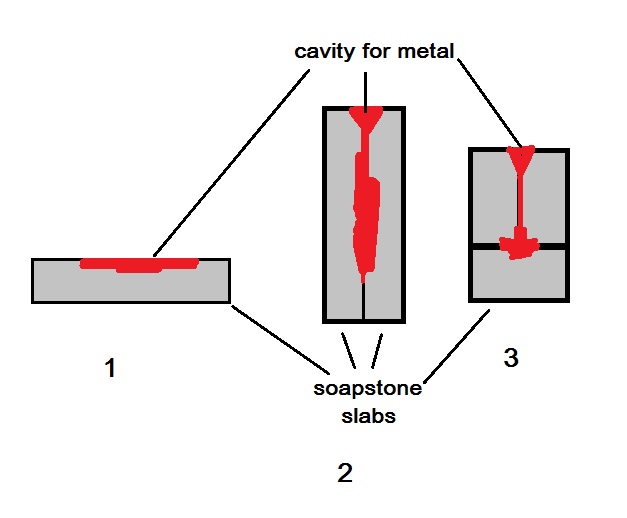
This graphic shows three basic mold forms with one, two and three slabs.

soapstone molds

I am going to assume that you have purchased good quality soapstone that is designed for carving. It should not have veins or cracks in it, and the texture should be uniform.

Let’s run through the basic process of making soapstone molds. It is possible to cast a simple object by carving into a single piece of stone, but most molds are made from two or more pieces of stone. One of the critical first steps when you are using two or more slabs of stone is to make sure that the slabs fit together tightly. The easiest way to do this is to choose two pieces of slab that are identical in size, flatten them as much as possible by rubbing them on a piece of fine wet/dry sand paper and then rubbing them together against each other. Using wet/dry sandpaper means that you can use it wet if you want to. Start with a coarse grade of sandpaper and work with finer and finer grades until the faces of the slabs are smooth. At this point I should mention that you should be wearing a good dust mask when you do this. Soapstone that is sourced from reputable companies is guaranteed not to contain asbestos, but stone dust is still not good for you.

So, back to the two piece mold. The two slabs of stone are now smooth and they fit together like a glove. It is now time to mark the outsides of the mold to make it easy to see when the mold is aligned correctly. I usually just line the two slabs up carefully and then draw lines across the side with an indelible magic marker. Mark each side with a different number of lines to make it super obvious which way the blocks need to be aligned.

Once the blocks are marked it is time to lay out the design on the blocks. The design should be sized and placed so that there is at least 1/2 inch of uncut stone around the outside of the design. Having a band of stone that is narrower around the outside edge means that the mold is much more likely to break. The same properties that make the soapstone a delight to carve, also make it fragile. Your mold will eventually break, but a carefully thought out layout will greatly improve its longevity.

Next time: Carving the Design


Metal Working Techniques – Part 10: Niello

Recently I have been doing research on some pieces of Slavic jewelry. I was discussing the type of surface decoration on this jewelry with a customer, and when I mentioned niello, I got a blank stare. So, I knew it was time for another metal techniques blog.

English: Anglo-Saxon golden belt buckle from t...

English: Anglo-Saxon golden belt buckle from the Sutton Hoo ship-burial 1, Suffolk (England). 7th century AD. British Museum. Deutsch: Angelsächsische goldene Gürtelschnalle aus der Schiffsbestattung 1 von Sutton Hoo, England. (Photo credit: Wikipedia)

Niello is a type of surface decoration that uses the differences in the natural color of two metals to create a contrasting design.  Niello is most commonly used on gold, silver, bronze, and steel. The Sutton Hoo Buckle that is shown above uses niello to emphasize the knot work designs.

The process of decorating an object with niello can be summarized as follows. The jewelry is created. It does not matter whether it is cast, soldered together or riveted, but the piece should be ready for final decoration. The surface is then engraved, etched, or chased to create depressions in the metal to hold the niello compound. It is also possible to create these depressions in the metal’s surface during the casting process. The depressions should be shallow, usually between 1/32″ and 1/64″. Deeper depressions may result in pitting or bubbling of the niello.

Modernly, most Western jewelers purchase pre-made niello from a supply house, but it can be made in the shop. There are many different recipes available, but most of them use silver, copper, lead  and sulphur. The carefully cleaned metals are weighed, according to the recipe that you are using, and then melted in a crucible, using either a torch or kiln. The melting process starts with the metal with the highest melting point, silver, then progressing to copper, and finally lead. Once all of the metals are melted the mixture is stirred with a charcoal stick to mix them thoroughly. Next the sulphur needs to be added. Some people preheat the sulphur in another crucible and add the molten metal to it, while others simply add the sulphur to the crucible containing the molten metal. The molten solution is then stirred with a graphite rod to ensure a proper mix.

The molten niello is then poured out onto a slightly oiled steel slab, and while still hot it is hammered out to make it fairly thin. A torch can be used to keep it hot if more hammering is required. The niello is allowed to cool. It is first broken up with a hammer and then ground with a mortar and pestle until all of the particles can pass through an 80-mesh sieve. For very fine lines, niello can be ground finer.

To use niello, it is first washed, like enamel, to remove any foreign particles. It suffers from the same problem as enamel: oxidation over time. The use of an airtight container to store niello that has been completely dried, will help extend its lifespan. Storing niello in lump form is another option.

The surface to which the niello is to be applied must be clean. The surface is painted with a borax solution and wet niello powder is placed in the depressions. The niello will shrink when heated, so it must be mounded slightly. Use the least amount possible, because excess niello will need to be removed by filing after it is fused. Allow the niello and borax to dry completely, place the piece in a 1000°F kiln, and watch for the surface of the niello to become smooth. As soon as the surface is smooth remove the piece from the kiln and allow it to air cool. When the piece is cooled completely the surface should be filed, ground, and polished to remove all excess niello.

I hope that this brief blog gives you a better idea of the origins of many of those wonderful designs that we find in ancient jewelry and armor pieces, and even a few modern pieces.

Merovingian brooch now in the British Museum. ...

Merovingian brooch now in the British Museum. Tag on exhibit states: “Disc brooch made of gilded silver and niello. Merovingian, 7th century AD. From Linz, Rheinland-Pfalz, Germany. MME 94,2-17,3” See BM database entry for more details. (Photo credit: Wikipedia)

Enhanced by Zemanta

Metal Working Techniques Part 9: Overlay

Overlay is another surface decoration technique which uses soldering. The process involves the creation of a least two pieces of art, the base piece and the actual overlay decoration that is soldered to the base. Overlay is commonly used in traditional Southwestern Indian jewelry, but the process of creating layers of sheet metal on top of each other as decoration has been used for a long time.

Prior to the development of modern torches, soldering was a fairly difficult process, involving the use of a blowpipe and a fuel source, or a kiln (oven). Most ancient soldering and fusing was only done on fine silver and high karat gold. The ability to have specially formulated solders that melt at different, and very specific temperatures, is a modern luxury. Ancient peoples understood how to make solder melt at a lower temperature but the precision with which our modern solders can be formulated is amazing.

This graphic shows the basic idea of how a piece of overlay is soldered together. The top and bottom layers of metal must meet very closely so that the solder will naturally flow between them and form a solid bond. The entire piece must be heated enough to have this bond extend completely under the top layer of metal.

overlay graphicTake a look at this picture of a silver belt buckle. The surface of this piece actually started out as two separate layers of metal. The top layer had the design transferred to it, and then that design was carefully cut out with a jeweler’s saw. The edges were carefully finished with a file and sand paper. The areas that show as black in the photo are actually the bottom layer of the buckle. If you look carefully and trace out the design lines you can see that a significant portion of the top layer is in one piece, but not all of it. The main portion of the top layer would have been soldered to the bottom layer first, and then any separate pieces would have been added later and soldered in place, using a lower temperature solder.

Overlay belt buckle

The most difficult things about doing this type of soldering is making sure that the surfaces of the two pieces of metal meet perfectly, and that all portions of the top layer are completely soldered to the bottom layer, while not getting too much solder into the areas that are not covered by the top layer. All excess solder has to be removed without damaging the design or the areas around it.

In the case of most Southwestern Jewelry, once the top layer has been completely soldered in place and any excess solder has been removed, the areas of the bottom layer that show can be treated with a chemical, like liver of sulfur, to turn it black. This blackening of the bottom layer creates contrast that makes it easier to see the design that is created by the top layer of metal. This use of oxidation to create contrast is used with many different types of metal work.

I hope that this brief article gives you a better understanding of the process of overlay decoration on jewelry.