I just love the look of silk banners and flags fluttering in the breeze. It doesn’t matter what kind of silk banner or flag that you want to make, the techniques are the same.

Silk Banner done like a Stained Glass window. (Photo credit: Jeff / Godfrey)
Our Medieval reenactment group recently held a silk banner workshop, and someone who could not attend asked for instructions. Well, we didn’t really have any “How to Make a Silk Banner or Flag” instructions since we were just all working together at someone’s house. I decided that I should write a set of basic instructions. Obviously these instructions will work for any sort of silk banner or flag, not just one designed to display heraldry. Silk flags can add a cheerful touch to your yard, garden, or event. It’s quick and easy to make your own unique silk banner or flag.

Gorgeous silk banner (Photo credit: litlnemo)
Please read the instructions all the way through BEFORE you start!
First let me say that the process of making a silk banner is actually rather simple. It is MUCH easier to show someone than it is to talk about how to do it. What makes the difference between an OK banner and a great silk banner is planning and attention to detail. I am in no way affiliated with any of the suppliers listed in this article – they just have, in my experience, the best supplies for doing this sort of project.
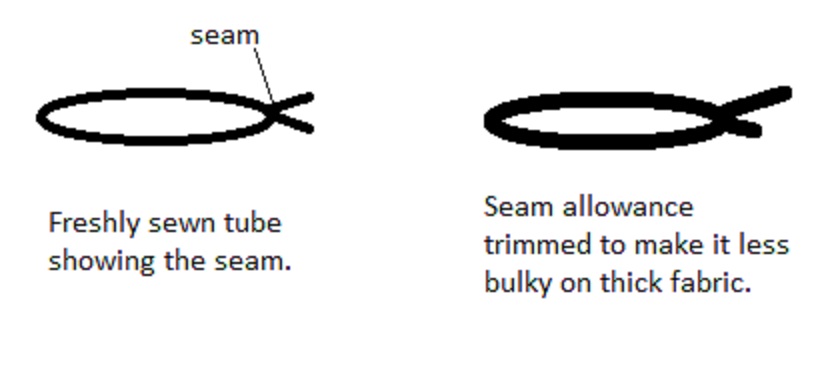
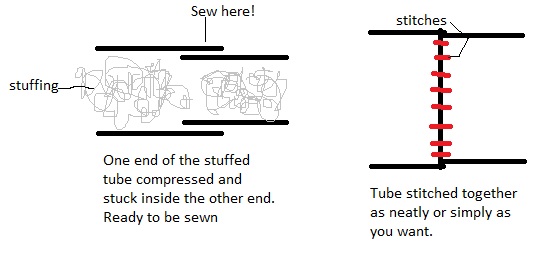
The Planning – You need supplies – silk, dyes, and special soap for washing out the extra dye when you are done “painting” your banner. The best source that I’ve found for these things is Dharma Trading – www.dharmatrading.com . They have lots of silk, either pre-hemmed, or in big rolls – your choice. We bought the pre-hemmed pieces, one less thing to hassle with. We wanted to make it simple so that everyone would be able to make a silk banner and use it quickly and easily. All folks needed to do was add some ties along the “pole edge” and it was ready to use. If you want to sew a “sleeve” for the pole to slide into on you flag, I recommend that you sew the sleeve, and test it with the pole that you want to use, BEFORE you place and “paint” the artwork.
The Artwork – You need to think about which direction the silk banner will be hung. If you are making a medieval-style banner, you need to decide whether you are going to simply place your heraldry on the banner, or whether you are going to use elements of your heraldry for a more artistic display. If you are making a modern art flag or banner, the same considerations apply to the design. Think about it. Think about the colors and how you will create them. Remember white is not painted on – it is left clean and dye free. You need to plan for that.
The ideal situation is to have full sized artwork that has good bold lines. The first workshop that I did I used a copy machine to blow up my pictures to the correct size for the banner that I would be working on. I made sure that all of the details showed clearly in the artwork. Trying to draw your artwork freehand is possible, but most people will be disappointed with the results. Either the artwork will be tiny on a big banner, or the art will simply not turn out well. At the last workshop I attended we had the advantage of having a digital projector connected to a computer. Artwork could simply be projected onto the wall and enlarged or shrunk down to exactly the size that was necessary for the size of the banner. The artwork was traced with a pencil onto a piece of white butcher paper. The pencil lines on the butcher paper were then carefully traced with a felt-tipped marker (I used a Sharpie brand medium point marker). This careful tracing allowed us to fine tune the design and make it really easy to see through the silk. I also brought a piece of artwork with me that I had printed out ahead of time. Avery Dennison, the folks who sell a zillion types of labels and such, make a banner kit, which comes with software. This software allows you to design banners with pictures and lettering. I printed out a picture using this software. It basically divides the picture into multiple pieces of 8 ½ x 11” paper. When you tape the pieces of paper together you get a large picture, which is perfect to use as a guide for making a banner.
The Colors – We used Dye-na-flow brand silk dye for all of our colors. White is achieved by not painting the white silk and black uses Setasilk Ebony Black silk paint. If you use black silk dye you will get a dark gray instead of a true black. For true black you need to use the silk paint. We bought all of the traditional heraldic colors green, blue, red, purple, yellow (for gold), brown (for natural items), black paint, and then the white silk acts as silver. If you’re making a non-heraldic banner, choose the colors that fit your design.
The colors are contained to specific areas with gutta – a gooey substance that comes in a small tube. We bought the Pebeo black and silver Water-based Guttas in tubes. If you do not use gutta, or some other resist, you will get fuzzy edges on your lines. This can create a very lovely affect for artwork, and is used in blending and shading, but for simple heraldic banners we wanted crisp lines, so we outlined each color area with gutta – just like in a kids’ coloring book..
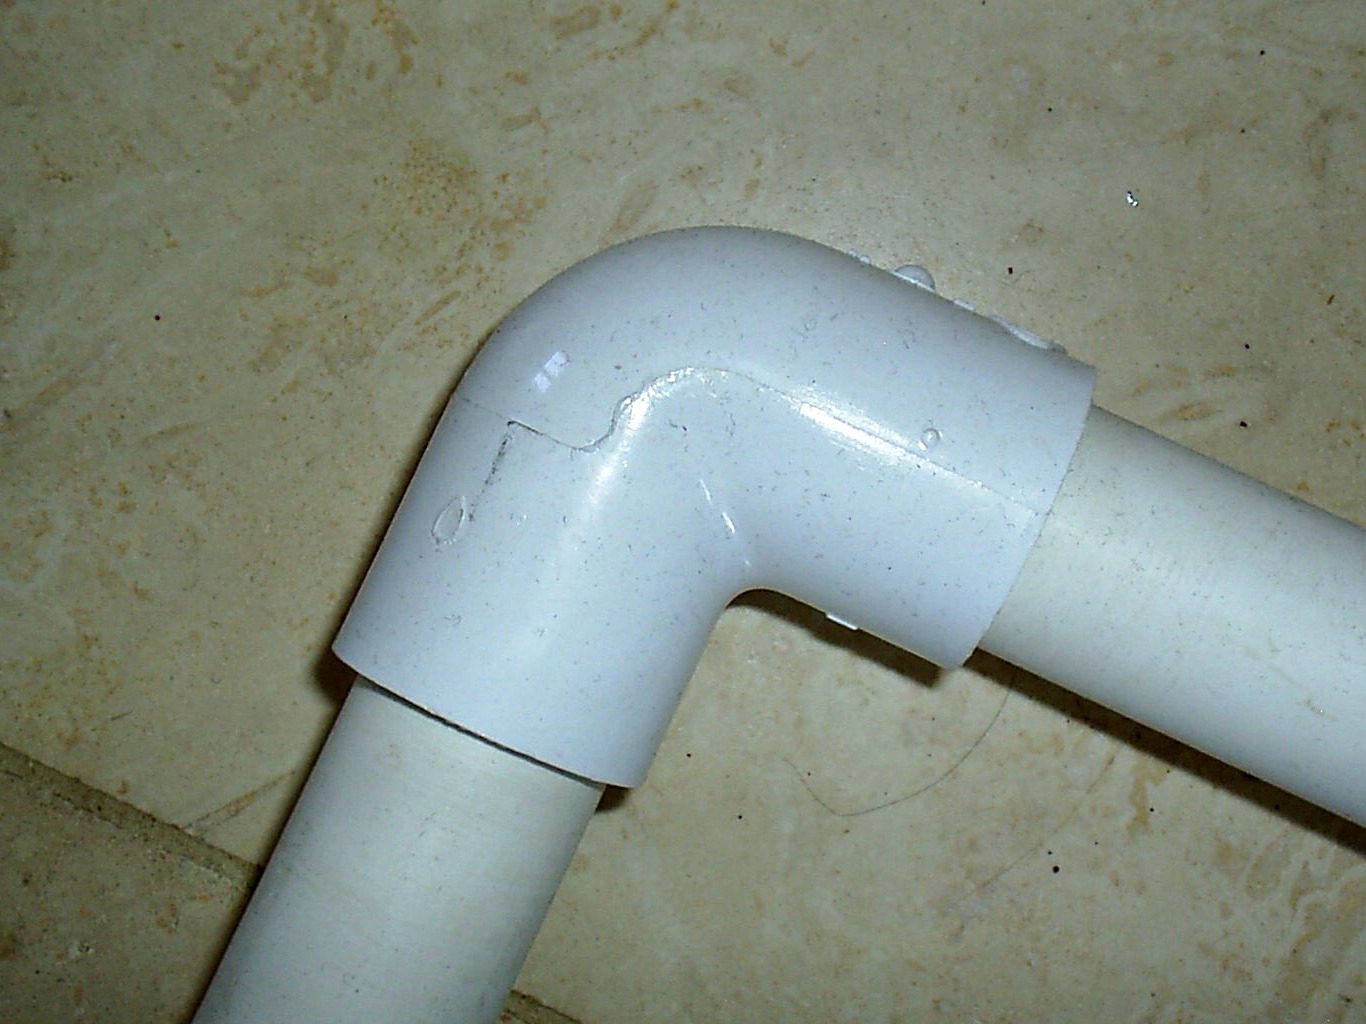
A Frame to Hold Silk – Once you have the colors and silk you will need a frame to hold the silk while you are painting with the dye. Our group has two sets of frames – one made of metal electrical conduit and the other made using PVC pipe. The frames are designed to fit specific sizes of silk pieces, with an area of about 3 or 4 inches open all the way around the fabric. The easiest frames to make are the PVC frames – you simply measure and cut 1 inch PVC pipe and slip on the fittings to hold it all together. DO NOT GLUE THE FRAME. If you glue the frame you will have to store it as a frame forever. If you just slip the pieces of pipe together you can take them apart to store them, which takes way less space.

This is a picture of the basic PVC frame. This frame was made from left-over scraps from an irrigation project. The blue that you see on the lower right hand corner is dried primer from that project – it does not affect the ability to slip pieces together or take them apart for storage. This next picture shows an up-close of a corner. All you need are straight pieces of PVC pipe and 90 degree corners. They just slip together to make the frame, and pull apart for storage. The only tool that you will need is a PVC pipe cutter or a hack saw for cutting the PVC. If the ends of your PVC pipe are very rough or “hairy” looking you may need to us a little sand paper to smooth them off.
Our larger frames, which were designed for use with long thin banners, are made from electrical conduit. These frames require the use of a pipe bender to make the corners. A long piece of conduit is bent with rounded corners, using the pipe bender, and then the ends of the conduit are joined with a conduit union. If you are building frames that will be used for a LONG time , such as in a Studio situation, these frames are very sturdy and should last forever if cared for. They must be stored carefully so that they are not bent and they can not be disassembled easily.
The silk fabric should be washed before using to make sure that there is no grease or other items on the fabric that might keep the silk dyes from penetrating the fibers. Once it is dry it will need to be stretched on a frame. The first time I made silk banners we actually sewed the silk onto the frames using a whip stitch with heavy sewing thread. It worked very well. We were able to get even tension on the silk and keep the silk taut, but sewing the silk to the frame is time consuming. The second workshop that I participated in we used large rubber bands (buy the big packs at a big box store or office supply store) and safety pins to stretch the silk on the frame. It worked well, but you need to be very conscious of the tension of the silk fabric.
My new preference for attaching the silk fabric to the frame uses large rubber bands hooked together with binder clips. This approach makes it easy for people who don’t have hand sewing skills. This worked really well because we were able to create very even tension on the silk fabric.
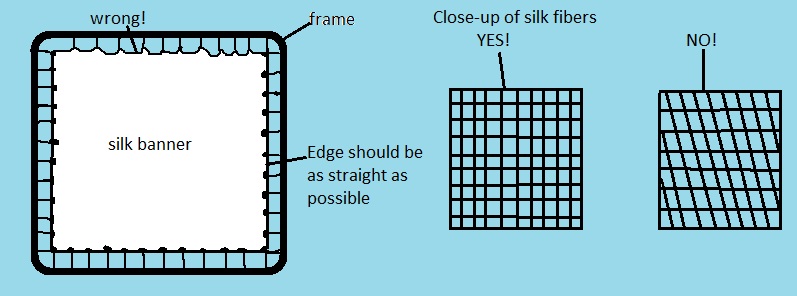
Getting the Silk Fabric Tension Right – If the edge of your silk looks like a series of tall waves, it means that you are putting the silk fabric under uneven tension. The problem is that when the silk fabric is released from the frame, the fabric will return to the natural shape formed by the threads. If the fibers in the fabric get too crooked it will affect your ability to create straight lines and accurate designs. Look really close at the weave of the silk – if the threads do not form an even pattern with the warp and weft of the fabric at roughly right angles to each other you may have trouble with your finished silk banner design.
Transferring the Design to SiIk Fabric – Once the silk is on the frame, lay the frame down on a clean surface (we used clean tables covered with a disposable plastic table cover) and slide the artwork under the silk and frame. Make sure that your artwork is placed exactly where you want it to be on the silk fabric. If necessary, tape the paper with the artwork to the table so that it lays flat and does not move. Once you have started to trace the design onto the fabric with gutta, it is VERY important to make sure that the frame does NOT slide around on the table surface. If the frame moves while tracing the outline of the design using gutta, you will risk getting gutta on the fabric where you don’t want it. You may also warp your design.
When you are ready to trace your design onto the silk fabric, take the top off of the gutta and carefully cut the tip off the tube to allow the gutta to come out. DO NOT squeeze the tube while you are doing this or the gutta will squirt out like thin toothpaste! Make the cut as small as you dare – you can always remove more of the tube tip if the gutta does not flow fast enough. You will be drawing on the fabric with the gutta – tracing the artwork through the fabric. WARNING! If the tube stops flowing do NOT squeeze harder while you try to draw. You probably have a small lump in the gutta. If you squeeze harder there is a very good chance that you will get a big blob of gutta that will come out all at once. So if the gutta slows down use a pin to clear the lumps. Check the flow of gutta carefully on a piece of paper before you use it again on the fabric. There is no way to remove gutta that is not where you want it to be! Once you have finished tracing the artwork on your silk banner using gutta, the gutta needs to dry thoroughly. Be careful to lift the banner straight up when you take it off of the table in case some of the gutta bled through to the back. You do NOT want to smear the gutta. Allow the gutta to dry until it is no longer tacky. We placed our banners in the sun outside to dry – the combination of a dry environment (Flagstaff, AZ) and the sun helped the gutta dry in about half an hour. If you live someplace that is damp, or the temperature is particularly chlly, you may need to allow the gutta to dry overnight to be sure that it is properly set.
DYES – Here is an exact list of the dye colors and other supplies that we bought for our silk banner project. I have used the same dyes at several workshops, in different parts of the country. The quality is excellent. Remember – for this specific project we were following the rules of heraldry, so we were limited to a specific set of colors. You need to consider carefully what colors you will need for your silk banner. This list was designed to allow about 18 people the opportunity to make 36″x36″ banners.
|
item |
Product name |
Color name |
Size |
Number |
|
Black |
Setasilk silk paint |
29 Ebony black |
250 ml |
1 |
|
Yellow |
Dye-na-flow |
802 yellow gold |
8 oz |
1 |
|
Red |
Dye-na-flow |
806 Brilliant Red |
8 oz |
1 |
|
Violet |
Dye-na-flow |
811 Violet |
8 oz |
1 |
|
Blue |
Dye-na-flow |
814 Azure Blue |
8 oz |
1 |
|
Green |
Dye-na-flow |
819 Bright Green |
8 oz |
1 |
|
Silver Gutta |
Pebeo Water-based Gutta in tubes |
11 Silver |
2 |
|
|
Black Gutta |
Pebeo Water-based Gutta in tubes |
12 Black |
5 |
|
|
Soap |
Synthrapol Low Foam |
1 qt |
1 |
|
|
Silk |
Habotai 8mm silk scarves |
20 |
Next time – Colors, setting the colors, and MoreTips on Successful Banner Making!
 Silk Hanging Honoring the Elements