Metal Working Techniques Part 7: Granulation

My first thought when I went to start this blog was that Granulation is magical and amazing. Now I realize that this is obviously an overstatement to most people, but understanding the process makes the sentiment correct for me. Granulation is a surface decoration technique that uses tiny granules (spheres) of  metal that are soldered, fused or eutectic soldered to the metal surface in patterns. The technique has been used for thousands of years and was probably invented by the Sumerians. Granulation was usually done in gold, although it is possible to do it with silver.

Gold serving Bowl with Pulviscolo Granulation ...

Gold serving Bowl with Pulviscolo Granulation Etruscan 7th century BCE (Photo credit: mharrsch)

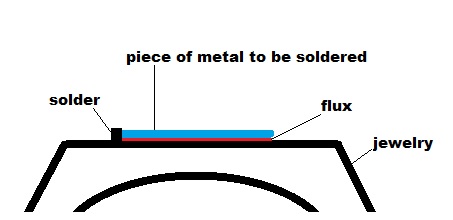
OK, so what is the difference between soldering, fusing, and eutectic soldering?

Soldering actually involves adding a lower melting temperature metal alloy (solder) to the surface of a metal piece and melting the metal alloy to hold two pieces of metal together. A chemical solution called flux allows the solder to flow into the tiny gaps between the metal, fill them and join the pieces of metal together. This technique is difficult to use with complex granulation designs because not all of the granules will solder at the same time and if you repeat the process some of the granules usually fall off. You also usually wind up with large puddles of extra solder on the surface of the piece in order to make the granules stick.

Fusing involves using granules and a metal surface that are made of the same metal alloy. The alloy is usually either fine silver (99.9% pure silver) or gold with a purity of at least 18k. The granules are temporarily glued in place with a special diluted flux and then the piece is heated in an oven until the surface just starts to melt. When the piece comes out of the oven the granules are fused to the surface of the metal piece and the flux has burned away. Modernly this process can also be done using electricity, which causes the granules to fuse to the metal piece without additional heat.

Eutectic soldering uses a special combination of plant gum and copper salts to glue the granules to the metal piece. When the metal is heated, the copper salts lower the melting point of the granules and the metal piece that they are glued to. This causes them to fuse together just where the granules touch the metal surface. The result is a very sturdy but neatly connected design.

I hope that this blog gives you a basic understanding of the process of granulation.

Next time: Filigree

Gold pin with a Mistress of the Animals (potni...

Gold pin with a Mistress of the Animals (potnia theron). Gold with granulation, ca. 630 BC. (Photo credit: Wikipedia)

Metal Working Techniques Part 6: Soldering

A lot of traditional craft jewelry is made with a technique called soldering. Most Southwestern Native American jewelry is soldered. But what exactly is soldering?

Soldering is a technique for joining two or more pieces of metal together using a melted metal alloy, called solder. The solder must melt at a lower temperature than the two pieces of metal that are being joined together. There are many different types of solder. Every type of metal has recommended types of solder. The goal is usually to match the color of the solder to the color of the metal, so that it doesn’t show when the piece is finished. It is also important to realize that some types of solder can damage specific metals – for instance solder with lead may be silver colored, but it will actually corrode Sterling Silver.

Once you have the appropriate solder for your metal you need to sort your solders by the temperature that they melt at. Solder comes in different temperature ranges for a very important reason. A lot of times when a piece is being assembled it needs to be soldered several times. The soldering process needs to be planed so that you start with the highest temperature solder and progress to the lowest temperature solder. That way you will not accidentally melt the previously soldered joints.

The other major ingredient that is necessary for soldering is flux. Flux keeps the metal clean while it is being heated and can also be used to help direct the flow of the solder.

The basic soldering process goes like this. Clean the pieces of metal that are going to be joined. Make sure that the surfaces that you want to join are smooth and meet up very closely, with no light showing between them. Put flux between the two pieces of metal and place tiny pieces of solder tightly up against the edge of the piece that is being soldered on.

This graphic shows the basic set-up for soldering a piece.

soldering graphic


So we have discussed solder and flux, but we have ignored a VERY critical part of the soldering process – heat. In order to solder we need a source of heat to melt the solder. The most commonly used sources of heat are an oven or a torch.

The type of oven that can be used for soldering is called a kiln. Whether it is gas or electric, the most important thing is that the temperature control on the kiln be accurate. You want to be able to solder without melting the piece.

The most commonly used type of torch used for jewelry work is probably the oxy- propane torch. This torch uses a tank of oxygen and a tank of propane, hooked together with a special pressure regulator. The pressure that you use and the size of the tip on the torch control the temperature of the torch. It is then up to the operator to make visual judgments about the progress of the soldering process and know when to move the torch, or remove the heat completely.

Soldering definitely takes some practice, but it is one of the most commonly used techniques in jewelry manufacture and it is very important to at least understand how the process works.

Next Time: Granulation

Metal Working Techniques Part 5: Etching

Etching is another way of creating designs on the surface of a metal object. All of the previous ways of creating designs that we have discussed have relied on physical modification of the metal surface, that is, we stamped, molded, or cut the surface to create a design. Etching relies on a chemical process, which actually eats away the surface of the metal.

This picture shows the type of elaborate designs that are characteristic of etched pieces.

Etched 2. Detalle.

Etched 2. Detalle. (Photo credit: Carme -)

Before we go any further I want to emphasize the importance of using caution and safety equipment with this process. The worst thing that most of the previous processes would have done if we had made a mistake is a mashed finger or a cut (assuming that we are wearing eye protection). But etching is different in two major ways: 1. Etching creates fumes. Some of the etching processes can create toxic fumes, and some just create vapors which will cause your tools to rust – never a good thing. 2. Some of the chemicals that can be used can burn your skin and mar other surfaces, too. This short article is not intended as a set of instructions, but rather as an informative piece to give you an idea of the basic process of etching.

The process of etching works like this. First the metal is cleaned thoroughly, and the surface is roughened slightly by rubbing it with pumice powder.

The design is transferred to the surface, and any area where you want the metal to remain untouched by the chemical process is covered with a special material, called a resist. The resist will resist the efforts of the chemical to eat away the metal and a design will be created. The chemical literally eats away the surface of the metal.

So what chemicals do we use for etching metal? Well, it really does depend on the type of metal. The usual answer is an acid. Acid etching was the first form of etching that was developed. Etching was commonly used in the 1500’s to decorate armor and to create printing plates.

Modernly, if you are etching on copper or brass, you also have the option of using a less dangerous substance – a salt – Ferric Chloride. This liquid will not burn your skin, although it will dye it brown and can potentially cause your tools to rust.

The same basic process is used for Ferric Chloride etching as for acid etching. A resist is applied to protect the portions of the metal that you do NOT want to etch, and then the piece is placed into the Ferric Chloride. The best technique is to actually suspend the piece that you want to etch from a floating object. The etching process will create bubbles on the surface that is being etched. In order to insure that the etching process works evenly the item should be agitated gently to remove the bubbles.

Historically etching required a fairly large amount of hand work to create the designs. Modernly the designs can be created on a computer and printed on special transfer paper that will act as a resist when it is applied to the metal.

I hope that this brief article gives you a basic understanding of the etching process.

Next time: Granulation

Enhanced by Zemanta