Metal Working Techniques Part 9: Overlay

Overlay is another surface decoration technique which uses soldering. The process involves the creation of a least two pieces of art, the base piece and the actual overlay decoration that is soldered to the base. Overlay is commonly used in traditional Southwestern Indian jewelry, but the process of creating layers of sheet metal on top of each other as decoration has been used for a long time.

Prior to the development of modern torches, soldering was a fairly difficult process, involving the use of a blowpipe and a fuel source, or a kiln (oven). Most ancient soldering and fusing was only done on fine silver and high karat gold. The ability to have specially formulated solders that melt at different, and very specific temperatures, is a modern luxury. Ancient peoples understood how to make solder melt at a lower temperature but the precision with which our modern solders can be formulated is amazing.

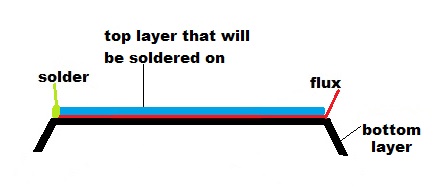
This graphic shows the basic idea of how a piece of overlay is soldered together. The top and bottom layers of metal must meet very closely so that the solder will naturally flow between them and form a solid bond. The entire piece must be heated enough to have this bond extend completely under the top layer of metal.

overlay graphicTake a look at this picture of a silver belt buckle. The surface of this piece actually started out as two separate layers of metal. The top layer had the design transferred to it, and then that design was carefully cut out with a jeweler’s saw. The edges were carefully finished with a file and sand paper. The areas that show as black in the photo are actually the bottom layer of the buckle. If you look carefully and trace out the design lines you can see that a significant portion of the top layer is in one piece, but not all of it. The main portion of the top layer would have been soldered to the bottom layer first, and then any separate pieces would have been added later and soldered in place, using a lower temperature solder.

Overlay belt buckle

The most difficult things about doing this type of soldering is making sure that the surfaces of the two pieces of metal meet perfectly, and that all portions of the top layer are completely soldered to the bottom layer, while not getting too much solder into the areas that are not covered by the top layer. All excess solder has to be removed without damaging the design or the areas around it.

In the case of most Southwestern Jewelry, once the top layer has been completely soldered in place and any excess solder has been removed, the areas of the bottom layer that show can be treated with a chemical, like liver of sulfur, to turn it black. This blackening of the bottom layer creates contrast that makes it easier to see the design that is created by the top layer of metal. This use of oxidation to create contrast is used with many different types of metal work.

I hope that this brief article gives you a better understanding of the process of overlay decoration on jewelry.

Stardust Moments in the SCA

This week I am taking a break from my collection of jewelry tidbits for an SCA moment. For anyone who does not know, the SCA is a non-profit educational organization that does Pre-1600’s Reenactment. This week a friend of mine posted an SCA version of a trivia game that discussed details of our SCA careers, and I was inspired. So here is my list of just a few of what we call “Stardust Moments”. The magic that makes us play this crazy game.

1. It was our first year going to the Pennsic War in Pennsylvania. Imagine a field four times the size of a football field, full of people in Medieval clothing, carrying hundreds of banners and pennants, some groups silent and others marching to a song. This is Opening Ceremonies at Pennsic… pure magic!

After opening ceremonies

After opening ceremonies (Photo credit: Craig Hatfield)

2.  It is the beginning of the field battle at Pennsic. Over a thousand fighters standing on the field, banging their swords on their shields and yelling before they advance on one another. The sound of the physical impact of the two battle lines crashing into each other is monumental, probably the closest that most modern people will ever come to the sheer adrenaline rush of massed combat during the Middle Ages. In the old days the lines of fighters were allowed to run at each other at full speed, but that was changed a few years ago when the powers that be realized that there were just too many injuries from the impacts.

Pennsic 32 before the field battle as shot fro...

Pennsic 32 before the field battle as shot from the east kingdoms side (Photo credit: Wikipedia)

3. Our first Gulf Wars in Mississippi. We heard that there was going to be a procession so we went to watch. Now we have seen LOTS of processions, and been in more than a few ourselves, but this one…imagine a procession of Royalty – Kings and Queens, Princes and Princesses, Barons and Baronesses, all on horseback. The horses, decked out in their heraldic barding, some of the gowns and other clothing specifically designed to be worn on horseback. Amazing!Gulf War 2013 Horse fixed

4. At a small local event my husband and I mentioned to the group that we wanted to include the children in the pageantry. In the morning I asked one of the boys if he wanted to help us in court. He walked in the procession with us, throwing packages of gummy bears to the assembled populace and then standing guard for us with a sword. I don’t think his feet ever touched the ground. The look of pure delight to be included in something “important”, and have the opportunity to throw gummy bears at people, was just too good. He has grown to be a fine upstanding young man that we can always count on for assistance.

5. And the breaking of stereotypes. At Gulf War Wars several years ago a large fighter stood in my booth and my husband asked him “So what do you like to do when you aren’t hitting people with sticks?” His answer? “Well I embroidered my tunic, and I made my leather shoes, I really like brewing, and I would like to learn to weave.” Yes, he is now a friend that we look forward to seeing every year.

6.  And then there are the rescues – during set-up at the Pennsic War, a big storm rolled in. Our pavilion top was up and secure, and I was in the process of putting on the walls. Suddenly the rain just started pouring down and the wind hit hard. There was a lot of hollering and scrambling as one of our neighbors garage tents started to take off in the high wind. I looked to see if there was anything that I could do, but there were already several sturdy men, including my husband, who had run to the neighbors rescue. I went back to quickly putting the walls on, to provide a place for folks to get in out of the rain. The rain was literally pouring off of the roof of the pavilion and down my arms. Several people dove into our pavilion to get out of the rain, and we all waited the long minutes until most of the excitement was over. The rain stopped as quickly as it had started and everyone immediately began running around and helping their neighbors. Pavilions were put back up. The neighbor’s garage tent, which had been saved, had still managed to move sideways over eight feet. We put a person on each of the six legs, walked it back to where it belonged and then quickly anchored it so that it would not go anywhere for the rest of the war. We all scrambled and helped both friends and complete strangers without a thought. That is what we do. THAT is the magic.

Now I don’t want to give people a false impression by any of my statements. These things are not just a “one off” experience. My heart still leaps with joy every time I see those horses at Gulf Wars or the banners at Pennsic. The same sort of “rescues” and quiet moments of delight happen at the smallest gatherings as well as the largest wars. It is the feeling of family and magic that keeps us coming back. I hope that you too can experience the magic!


Enhanced by Zemanta

Metal Working Techniques Part 8: Filigree

So first of all what exactly is Filigree?

Filigree is a technique for creating simple or elaborate designs from square, rectangular, twisted, round, or beaded wire. It can be combined with other techniques, like granulation. One of the most important characteristics of filigree is the use of sweeping spiraling designs. It is possible to do straight geometric forms with filigree, but traditionally this is much less common.

This picture of a decorative dish that was created with filigree shows the amazing complexity that is characteristic of traditional style filigree work.

English: Dish, Filigree work

English: Dish, Filigree work (Photo credit: Wikipedia)

Filigree can be used to create the entire piece, or just as a surface treatment on a piece of jewelry or sculpture. The technique has been used for thousands of years. The Greeks had developed this technique to a high art by 350 BC. This picture shows filigree, used as a surface decoration on a piece of sculpture from the Tang Dynasty (618 – 907 AD).

English: Tang Dynasty figurine horse with gild...

English: Tang Dynasty figurine horse with gilded filigree (Photo credit: Wikipedia)

Filigree was traditionally executed in gold or silver. Modernly it is usually done in gold, silver, or nickel silver, but technically it could be done using any metal that can be soldered or welded together.

Filigree work can be flat or very three-dimensional. The modern sculptural miniature in this picture is an excellent example of the versatility of filigree as an art form.

How is Filigree created? The technique varies slightly depending on whether it is being used as a stand-alone form, or a surface treatment. If filigree is used as a stand-alone form, care must be taken to the make the piece structurally stable.  The wire is carefully formed using fingers and pliers. The pieces of wire are placed together so that they touch. Care should be taken to create a fairly compact form, with no loose coils that might tend to catch on hair or clothing. The individual coils are placed so that they touch. Then flux and solder are applied, and the piece is soldered together.

If the filigree is being used as a surface treatment, the base piece of metal is created first. Once the base piece exists, the filigree is placed on the surface and soldered in place. The major concern is making sure that the filigree is solidly attached to the surface with no loose pieces or pieces that stick out that would snag on things.

Filigree that is used as a surface decoration relies on the piece it is soldered to for structural stability. The form can be as simple as a circle or as complex as the most elaborate spiral flourish.

The gold piece in this picture uses a gold sheet that has been formed with chasing and repousse as it’s structural base. Beaded wire, and spiraled wire (formed into a circle around the center of the largest flower) are combined with granulation and other forms to create this elaborate design.

 Earring decorated with bosses, globule cluster...

I hope that this brief blog gives you a basic understanding of the technique of filigree and the complexity of the design and assembly process.

Next time: Overlay

Enhanced by Zemanta