Casting Metal: Soapstone Molds – Part 3 – Carving the Block and Getting Ready to Pour the Piece

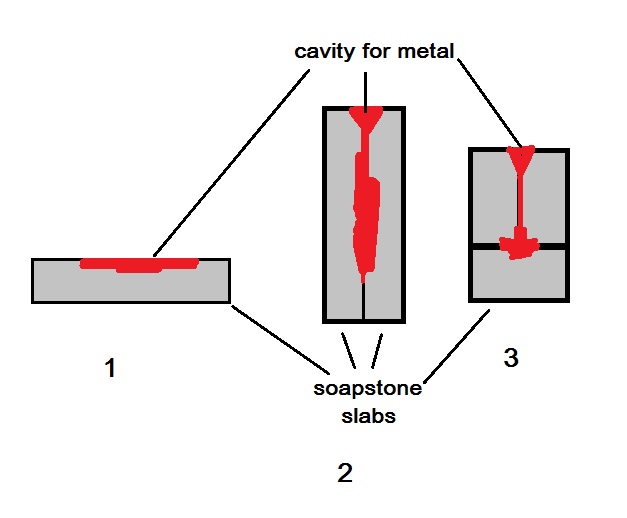
Once you have worked out the details of placing your design within the blocks, and transferred the design, you need to start carving. Many people will actually do the carving of the designs for the molds under water. I don’t always do the carving completely underwater, but I do dip the stone in water regularly to reduce the amount of dust that gets into the air, and I always wear a dust mask.

Soap stone is soft enough to be carved with sharp items like dental tools or sharpened nails, or modern tools like diamond burs and dremel-style electric tools. I suggest experimenting on a scrap piece of soapstone before you actually work on your mold. Make sure that you understand how much pressure it takes to actually carve the stone. Different batches of stone can have different hardnesses. Figure out how your tool behaves, and how you can control the tool so that it does not slip. Be careful to be aware of your hand placement so that you can’t accidentally stab yourself if the tool does slip. You may find that a piece of the weird rubbery drawer liner that they sell will help to keep your block from sliding around as you carve it. Remember, carving soapstone is a skill that takes practice and patience.

One of the dangers of carving soapstone in water is the water itself. The soapstone must be 100% dry before you use it to cast in. Let me repeat that – 100% dry. If there is any water left in the mold you risk cracking the soapstone from thermal shock, or even worse, what I call a “volcano”. This is when molten metal and steam shoots straight up in the air. This is EXTREMELY dangerous and can result in some really nasty burns.

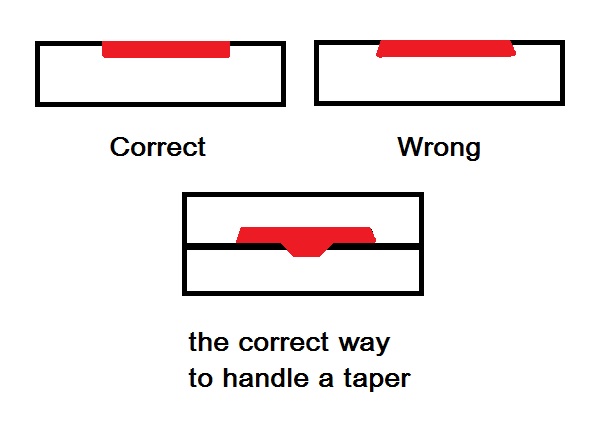
So now you have carved your soapstone mold. You have double checked it to make sure that there are NO undercuts in the mold, and that the mold is completely dry. If you have any doubt about the mold being dry you can lay the pieces, inside surface up, in a cookie try in a conventional oven at the lowest setting for an hour. It is your job to be safe.

English: Chunks of pewter from a pewter spoon

English: Chunks of pewter from a pewter spoon (Photo credit: Wikipedia)

I use a small electric furnace to melt my pewter. You can purchase small cast iron pots, shaped like small saucepans with a spout, for melting pewter. I only use lead free pewter. True pewter contains lead, which can be a serious health issue. If the pewter is overheated the lead will cook off as a vapor. This is dangerous. As a merchant who sells in multiple states around the US, I must conform to standards for lead in jewelry. Not having any lead makes it a LOT easier, and safer.

Now it is time to set up for your first pour. Heavy insulating gloves, like welding gloves, and eye protection are a good idea. I wear either a leather apron or a cotton welding apron and closed toed leather shoes. My hair, which is long, is pulled back out of the way and I usually wear cotton blue jeans. This may all seem excessive, but metal that is 500 to 600 degrees can leave a nasty burn.

Next time: Pouring the Metal and Perfecting the Mold

Casting Metal: Soapstone Molds – Part 2

Once you have your design laid out on paper, it needs to be transferred to the block of soapstone. I am assuming that you are doing a relatively flat piece. More complex pieces are beyond the scope of this overview. Be sure that your design does not have any undercuts. Undercuts will act like a physical lock and prevent the hardened metal from coming out of the mold. The diagram below shows the basic principles of laying out a design. You need to create a cavity that will allow the metal to come out of the mold once it is cooled. The bottom diagram shows how to place a double tapered piece so that it uses the opposite block of stone to end the taper and does not create any undercuts.

how to handle a taperOne very important thing that you need to consider when you are doing the design layout is where the metal will be poured into the mold. Where is that not particularly attractive piece of metal, called a sprue, going to connect to your finished piece? It needs to be attached so that it can be cut off and filed flat without ruining your design. The sprue also needs to be large enough to act as a reservoir for extra metal. Metal shrinks as it cools, and having extra metal that your piece can pull from is a good thing. You may need to experiment with increasing the size of your sprue if your piece does not cast correctly, so try to allow for that in your planning.

soapstonemoldlayoutThis is the general layout for a basic soapstone mold design. The cavity for the metal is centered within the block of soapstone, except for the sprue, which goes to the edge of the block and ends in a funnel shape, to make it easier to pour in the metal. There are no undercuts that will trap the hardened metal and keep it from releasing from the mold.

The design that you have chosen needs to be transferred to your soapstone blocks. This can be a bit challenging the first time that you try it because you need to work three dimensionally. Transferring the design can be done by tracing around a cut-out copy of the design with a pen or pencil, if it is a simple shape. If this does not work well enough you may want to score the block using a sharp implement. This is also helpful if you need to add more detail. You can make small dots that act as reference points. You need to decide what will work for you. Some types of carbon paper will allow you to trace the entire design onto the block. Experiment. You may need to trace the design in stages, depending on its details. This is especially important because of the need to work in a three dimensional fashion. If you have designs on multiple levels of a piece, you may need to trace them on in stages as you carve down into the block.

Next Time: Carving the Block and Pouring the Piece

Casting Metal: Soapstone Molds Part 1

One of the things that I specialize in, in my shop, is cast metal. I cast pewter, bronze, white bronze, and sterling silver into an assortment of pieces of jewelry and dress accessories. Customers often ask me questions about casting, so I am going to write a set of blogs to help folks understand the basics of casting.

A common, and relatively simple form of casting, that was done before and during the Middle Ages, was soapstone casting. This is a relatively straight forward process where the artist carves soapstone to create cavities that molten metal can be poured into.

This graphic shows three basic mold forms with one, two and three slabs.

soapstone molds

I am going to assume that you have purchased good quality soapstone that is designed for carving. It should not have veins or cracks in it, and the texture should be uniform.

Let’s run through the basic process of making soapstone molds. It is possible to cast a simple object by carving into a single piece of stone, but most molds are made from two or more pieces of stone. One of the critical first steps when you are using two or more slabs of stone is to make sure that the slabs fit together tightly. The easiest way to do this is to choose two pieces of slab that are identical in size, flatten them as much as possible by rubbing them on a piece of fine wet/dry sand paper and then rubbing them together against each other. Using wet/dry sandpaper means that you can use it wet if you want to. Start with a coarse grade of sandpaper and work with finer and finer grades until the faces of the slabs are smooth. At this point I should mention that you should be wearing a good dust mask when you do this. Soapstone that is sourced from reputable companies is guaranteed not to contain asbestos, but stone dust is still not good for you.

So, back to the two piece mold. The two slabs of stone are now smooth and they fit together like a glove. It is now time to mark the outsides of the mold to make it easy to see when the mold is aligned correctly. I usually just line the two slabs up carefully and then draw lines across the side with an indelible magic marker. Mark each side with a different number of lines to make it super obvious which way the blocks need to be aligned.

Once the blocks are marked it is time to lay out the design on the blocks. The design should be sized and placed so that there is at least 1/2 inch of uncut stone around the outside of the design. Having a band of stone that is narrower around the outside edge means that the mold is much more likely to break. The same properties that make the soapstone a delight to carve, also make it fragile. Your mold will eventually break, but a carefully thought out layout will greatly improve its longevity.

Next time: Carving the Design